Sky Pointer
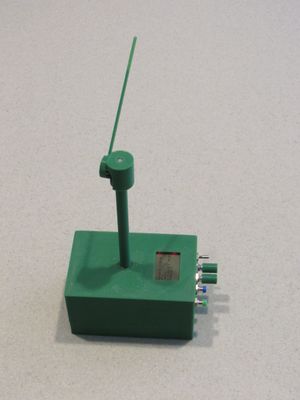
This is a device for more easily finding objects in the sky, such as satellites, visible planets, and the moon and sun. I've seen people build pointers that always point at the International Space Station, and I wanted to extend this for more easily tracking any satellite at night (for viewing), or during the day (for antenna tracking). While doing some testing on tracking satellites at night, I found that I would often move my device, misaligning the pointer. The moon, sun, and planets made for good reference points, so I eventually added tracking for them as well.
The heart of the device lies in translating coordinate systems into horizontal coordinates. This is the local viewing conditions of an observer on the earth's surface; when given GPS coordinates and a time and date, the device calculates which compass heading to face, and how high above the horizon the object is. My code is based on two existing projects: Grady Hillhouse's ISS pointer[1] for the satellites (modified to switch between many satellites instead of permanently tracking just the International Space Station), and Practical Astronomy with your Calculator or Spreadsheet 4th Edition[2] which is an excellent textbook that walks you through all the calculations needed to calculate the positions of the stars and planets. I translated several of the methods presented in this book into C code.
2019 Redesign
After completing the changes to the original software (tweaking the spg4 code to read from TLE files themselves rather than hardcoded strings, and translating the textbook into code), my original physical build consisted of two stepper motors hot-glued together. This setup is clearly not the ultra-portable device that I had intended it to be, also, the motor wires would wrap around one another and get stuck, meaning that at some point the motors would need to go in reverse and unwind the wires.
Mechanics
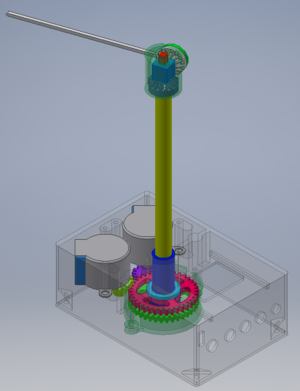
My redesign is based around two coaxial shafts. One shaft adjusts the azimuth (compass direction) of the pointer, and the other drives a bevel gear which adjusts the elevation (up/down) of the pointer. The coaxial shafts themselves will hold the pointer up, and also allow me to place the two motors in the base of the unit. This design also allows each shaft to rotate indefinitely in any direction without tangling any wires.
The inner shaft is keyed (because the shaft is square), but the outer shaft is not. Originally, I intended to superglue the outer shaft parts together, but after completing the first prototype I decided that the shaft sticking out of the base would be rather fragile, so I changed the design to allow the shafts to pull out of a socket and separate from the base. The outer shaft is now a friction fit, which is fine for the tiny load of a plastic pointer.
The remaining mechanical challenge was in software, to take advantage of the shaft's infinite rotation. When a motor is commanded to go to a position, I calculate the move going clockwise, and again going counter-clockwise. The move with less steps is the one that is used.
Software/UI
With intent to make this system into a fully portable design, I added a screen and some buttons. Because most of the software was already done from the v1 version, the operator interface was the main software challenge of this build. The interface is based around two rotary encodes. In normal "run" mode, they adjust the offsets of the pointers. In the selection menus, they scroll up and down lists. They are also used to input numbers, with one used to select the digit, and the other to increment and decrement it.
My v1 design didn't have a screen, so I used a web interface hosted on the ESP8266. This is no longer needed, except for an uploader section so I can upload new TLE files (TLE entries contain the parameters of the satellite orbits).
Electronics
On the electronics side of things, there is an ESP8266 doing all the processing, and the aforementioned screen. The 8266 does not have nearly enough IO to drive the screen and motors, and also read the buttons, so I added an MCP23017 I2C io expander, setup with 8 output lines to drive the two motors, and 8 input lines to read four buttons and two encoders. The IO expander also has internal pull-up resistors, which reduces parts count on the buttons even further.
Having an I2C bus ready, I added the GY-91 module from v1 into the mix, hoping to use it's compass to adjust correct for the orientation of the base if rotated. I suppose I could also be using the gyro for the same purpose, but this is not implemented yet.
One annoying thing about this setup so far is that everything is lost when you turn off the box, including setting the time. I borrowed a DS3232M I2C real time clock chip from my Electronic Time Capsule stock, and connected it up. I immediately found that the I2C address conflicted with the GY-91's address, but luckily the GY-91 includes an address pin that lets you change the address. With that done, everything seemed to be working smoothly. A separate button cell keeps the DS3232 powered even when the main battery is completely dead, and it keeps the time just fine. The DS3232 also has a tiny amount of battery backed RAM, which is enough to store things like the observer's location and the compass calibration. Yes, I could store these things in SPIFFS, but this works fine too. Eventually I hope to store the complete device state inside the RAM so that when you turn the box back on you're exactly where you left off.
As a final note, I also replaced the screen backlight LEDs with red colored ones, which helps keep your night vision when using the device at night.
Power
As a portable device, I added an 18650 battery, protection/charger board, and a 5v step-up board. The motors run on 5V, and the 5V bus then goes through a 3.3V regulator that powers everything else. For charging the battery, I use a DPDT switch to both disconnect the battery from the 5V step-up board, and connect the 5V from charger cable into the 5V bus. As a side effect, the device is always powered on while charging, which is usually fine (and what you want). Even if it isn't, the motors can be disabled, which leaves the other electronics, which don't use much power. Some capacitors I added keep the entire system powered when switching between power sources, if done fast enough.
Files
This is the source for the original version: File:Skypointer-v1.zip
2019 Redesign (version 3): File:Skypointer-v3.zip This includes my work and the libraries that I have written. The U82Glib, SPG4, and MPU9255 libraries are available elsewhere. Includes Arduino sketches and CAD.

