2025-07-26 | [radiclock]
previous: Atomic Clock
Experiments in non-oscillatory timekeeping
It’s an “atomic” clock! The radioactive kind. Trying to tell the time with a rock and a Geiger counter.
Clocks that tick were invented about 700 years ago with the invention of the verge escapement and it was an immediate improvement. Before then, the best we could do was look at some sort of continuous process, like sand falling in an hourglass, or the rate at which a pot was filled by a stream of water. Since then, humanity’s best time measuring instruments continued to use oscillatory processes; we went from plain inertia to pendulums in 1656, then to springs and balance wheels, until electrically powered tuning forks were developed, then miniaturized (as quartz crystals). Today our best clocks measure characteristic frequencies of atoms themselves. Even sundials technically uses the readily predictable frequency of the earth’s rotation to come up with a reasonably accurate answer.
With these developments in mind, is there still any room for clocks that do not operate on any predictable frequency? Actually, yes, a very important one. Radiometric dating uses the different elements produced by radioactive decay to help gauge the age of things on geological time scales. On the short term, radioactive decay is known to be completely random – no one can ever know when a particular atom will decay. But on the long term, random events become statistics, and half lives become apparent, in the same way that nobody can predict if a flipped coin will lands heads up, but after many tries, you can be pretty sure it will around 50% of the time. Nuclear decay should make for a reasonably accurate clock, as it it unaffected by temperature, pressure, vibration, electricity, or anything else you have on hand. You would need the intense nucleus-blasting radiation flux inside a nuclear reactor or particle accelerator to have any effect on it.
The problem is that this can take a while. The half life of radium-226, which contaminates the Curie’s lab notebooks, is 1600 years. So even though more than a lifetime has passed, these papers are nearly as radioactive today as they were when radium was discovered in 1898. Other radioactive materials are far too short – all the polonium-210 in my 1950’s polonium spark plug has fully decayed into lead decades ago.
But we shouldn’t need to wait around for decay products to build up, when we can measure the other part of radioactive decay (the radiation particles) directly. On my Geiger counter, there is a meter movement marked in milirontgens/hour. These dose rates are associated with a certain rate of clicks of the Geiger tube, each click being a radiation particle that was detected. The way you’re supposed to use this is to keep time with a stopwatch, and make note of the dose rate to estimate your dose. But there’s no reason that if you’re measuring a constant dose rate, you can’t count the number of clicks, and come up with an estimate of the time. Technically, you can apply this idea to anything – if I somehow notice that on average, 8 cars drive down my street per hour, and I sit on the porch and wait until 8 cars pass, then on average, about an hour has passed.
“On average” might be doing a lot of heavy lifting here, but in theory it should be a pretty good estimate after a long enough time with a lot of samples. Let's see!
I put the hardware for this project together in May of 2023, and it has been running in various forms since then. It has been reset and updated many times, but does include a full 365-day long run. The 1 Hz contest just gives me an excuse to write it up properly.
You can check the current status of the clock on my website.
One thing I should clear up right at the beginning, this clock is "atomic" not as in "uses special properties of atoms" but instead as in "atomic age" - a radioactive renaissance era in which it one day seemed that plutonium would be available at every corner drugstore. The two are about as unrelated as you can get besides having atoms involved (which describes most of everything, come to think of it).
The kind of ultra-precise, Einstein-confirming atomic clock you are probably thinking of exploits the fact that when some elements (like cesium-133) are hit with a microwave radio signal of a certain frequency, the electron configuration will change just enough to affect the magnetic properties of the atom. You can then use a magnet to determine which atoms were hit with the correct frequency, and really dial it in to a staggering level of precision.
I've seen no better explanation of this than the one CuriousMarc did when he repaired his HP 5061A, which he has incidentally also entered into this very same 1 Hz challenge.
Normal atomic clocks are not radioactive in any way, except for the very latest research into "nuclear clocks" which use the properties of the nucleus itself rather than the electron cloud, and use radioactive materials only by coincidence.
This also isn't an atomic powered clock. I know one of those "nuclear batteries that last 50 years" make the rounds every few years, but even if you could make one yourself the power output would be too low to drive even an LCD clock. We also aren't building an RTG. For what I'm doing, I'm not even capturing any radiation energy at all.
A lot of ideas you think up have already been thought of and patented long before you were born. So a few minutes after I had this idea, I went looking for people who had already done it. Not surprisingly, I found a couple almost immediately.
One is a project right here on HaD, the "Gammaclock" from 2018. This is almost exactly what I wanted to build. This one had an interesting idea for adjusting the rate of the clock: the radioactive source was to be mounted on a screw, so it could be adjusted closer or further from the geiger counter. Unfortunately, the author seemed to abandon the project after just a few days, and there hasn't been an update on it in several years.
The next source I found was from a guy writing a book about clocks., which contains quite a collection of ones that use radioactive decay. One is currently inside a Japanese time capsule, designed to move a dial as a tiny metal accordion is filled with the helium decay products from a tiny pellet of plutonium, a process which will take 5,000 years.
Also included were several patent listings, filed a bit before quartz wristwatches broke onto the scene. Perhaps in an alternate timeline, the cheap watch prize in your cereal box could have had technetium-99 inside.
Probably the best historical precedent for a clock that works like this one is which was once installed in the (then brand new) New York Chase Manhattan Bank building in 1959, counting pulses of cesium-137. Little description remains of this device online, except for the memories of one of the old executives, who said it was widely inaccurate and removed for repairs often, until one day it simply disappeared. How it earned the name “atomic clock” is anyone’s guess, since the first atomic clocks as we normally call them had already been invented by this time.
As of writing this (July 2025), someone has just published this one, no doubt another entry for the 1 Hz challenge: Lord Vetinari’s Clock with Radiation. The author of this one is trying to use radiation directly to drive their clock, varying the distance between their source and detector to get that magic tick rate of once/second on average. They are somewhat helped by using a pair of detectors in order to narrow down the specific energy and direction of the radiation to tell their source apart from background radiation.
The geiger counters I'll be using won't have that luxury, they detect radiation of all energies in whatever direction the particles happen to hit them from. I'll attempt to drown out the natural background radiation by using a "hot" sample that makes the counters click fast enough that the background is insignificant. Also, I'm not going to build any sort of adjustment into mine, it's going to be a matter of carefully calibrating what rate the final assembly ends up as, and scaling that number to the correct time accordingly. Since mine will click many times per second, I'm hoping this will help drive a similar clock mechanism with reasonably regular length seconds, not the mind-melting uneven ticking of a proper Vetinari Clock.
Any radiation experiment starts with the radiation source, and seeing as, much like everyone else, I don't have access to any of the more intreating materials, we'll be making do with whatever household sources we can find:
What I actually ended up using was a piece of radioactive ore. I'm not much of a rock hound, but the person who gave it to me definitely is; he personally mined it from a location in northern Canada. He told me it contains uranium and thorium, and though I forgot whatever mineral name he said it was called, to my untrained eye it looks like quite a nice sample of pitchblende, though you'd be forgiven for mistaking it for coal.
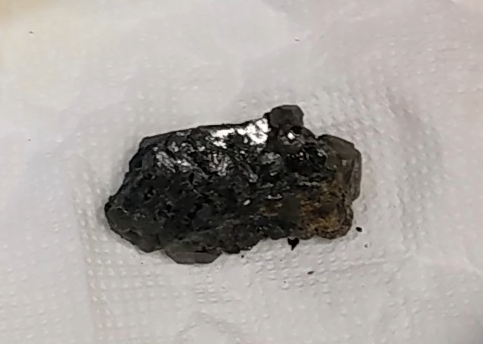
Fun fact, the name 'pitchblende' essentially translates to 'deceiving black rock'. When this material was discovered 500 years ago, miners thought it contained a metal ore like silver. It was heavy, after all. But when they tried to refine it, they got nothing (deceived). My sample is also noticeably heavier than a normal rock, though I did not weigh it (it's been in the clock for some time now), if I had to guess it would be about 40-50 grams.
Actually, one reason I picked the rock (other than that it makes the geiger counters click the fastest) is the fact that it's a rock. Uranium ore is never just uranium. If you have some that is freshly refined, leaving only the uranium atoms, it's activity level will increase over the course of months. That's because the daughter products that the uranium decays into will begin to build back up, and these are radioactive as well. The daughter products actually contribute most of what you are detecting with a regular beta-gamma geiger tube, as U-238, U-235, and Th-232 are all alpha emitters. Not a problem for a rock which has been around billions of years, which has had plenty of time for these daughter products to reach a steady state, constantly being generated by the parent uranium and thorium, then decaying per their own half life some time later.
For a rock, we aren't going to have to worry about the half life of the source either. The half lives of natural uranium and natural thorium are long. Remember, these atoms had to wait billions of years to end up in this experiment, and there is still plenty of them left in the sample. Your lifespan, or all of human history for that matter is just a rounding error on this scale, and we can effectively treat the rate of change of decay as zero.
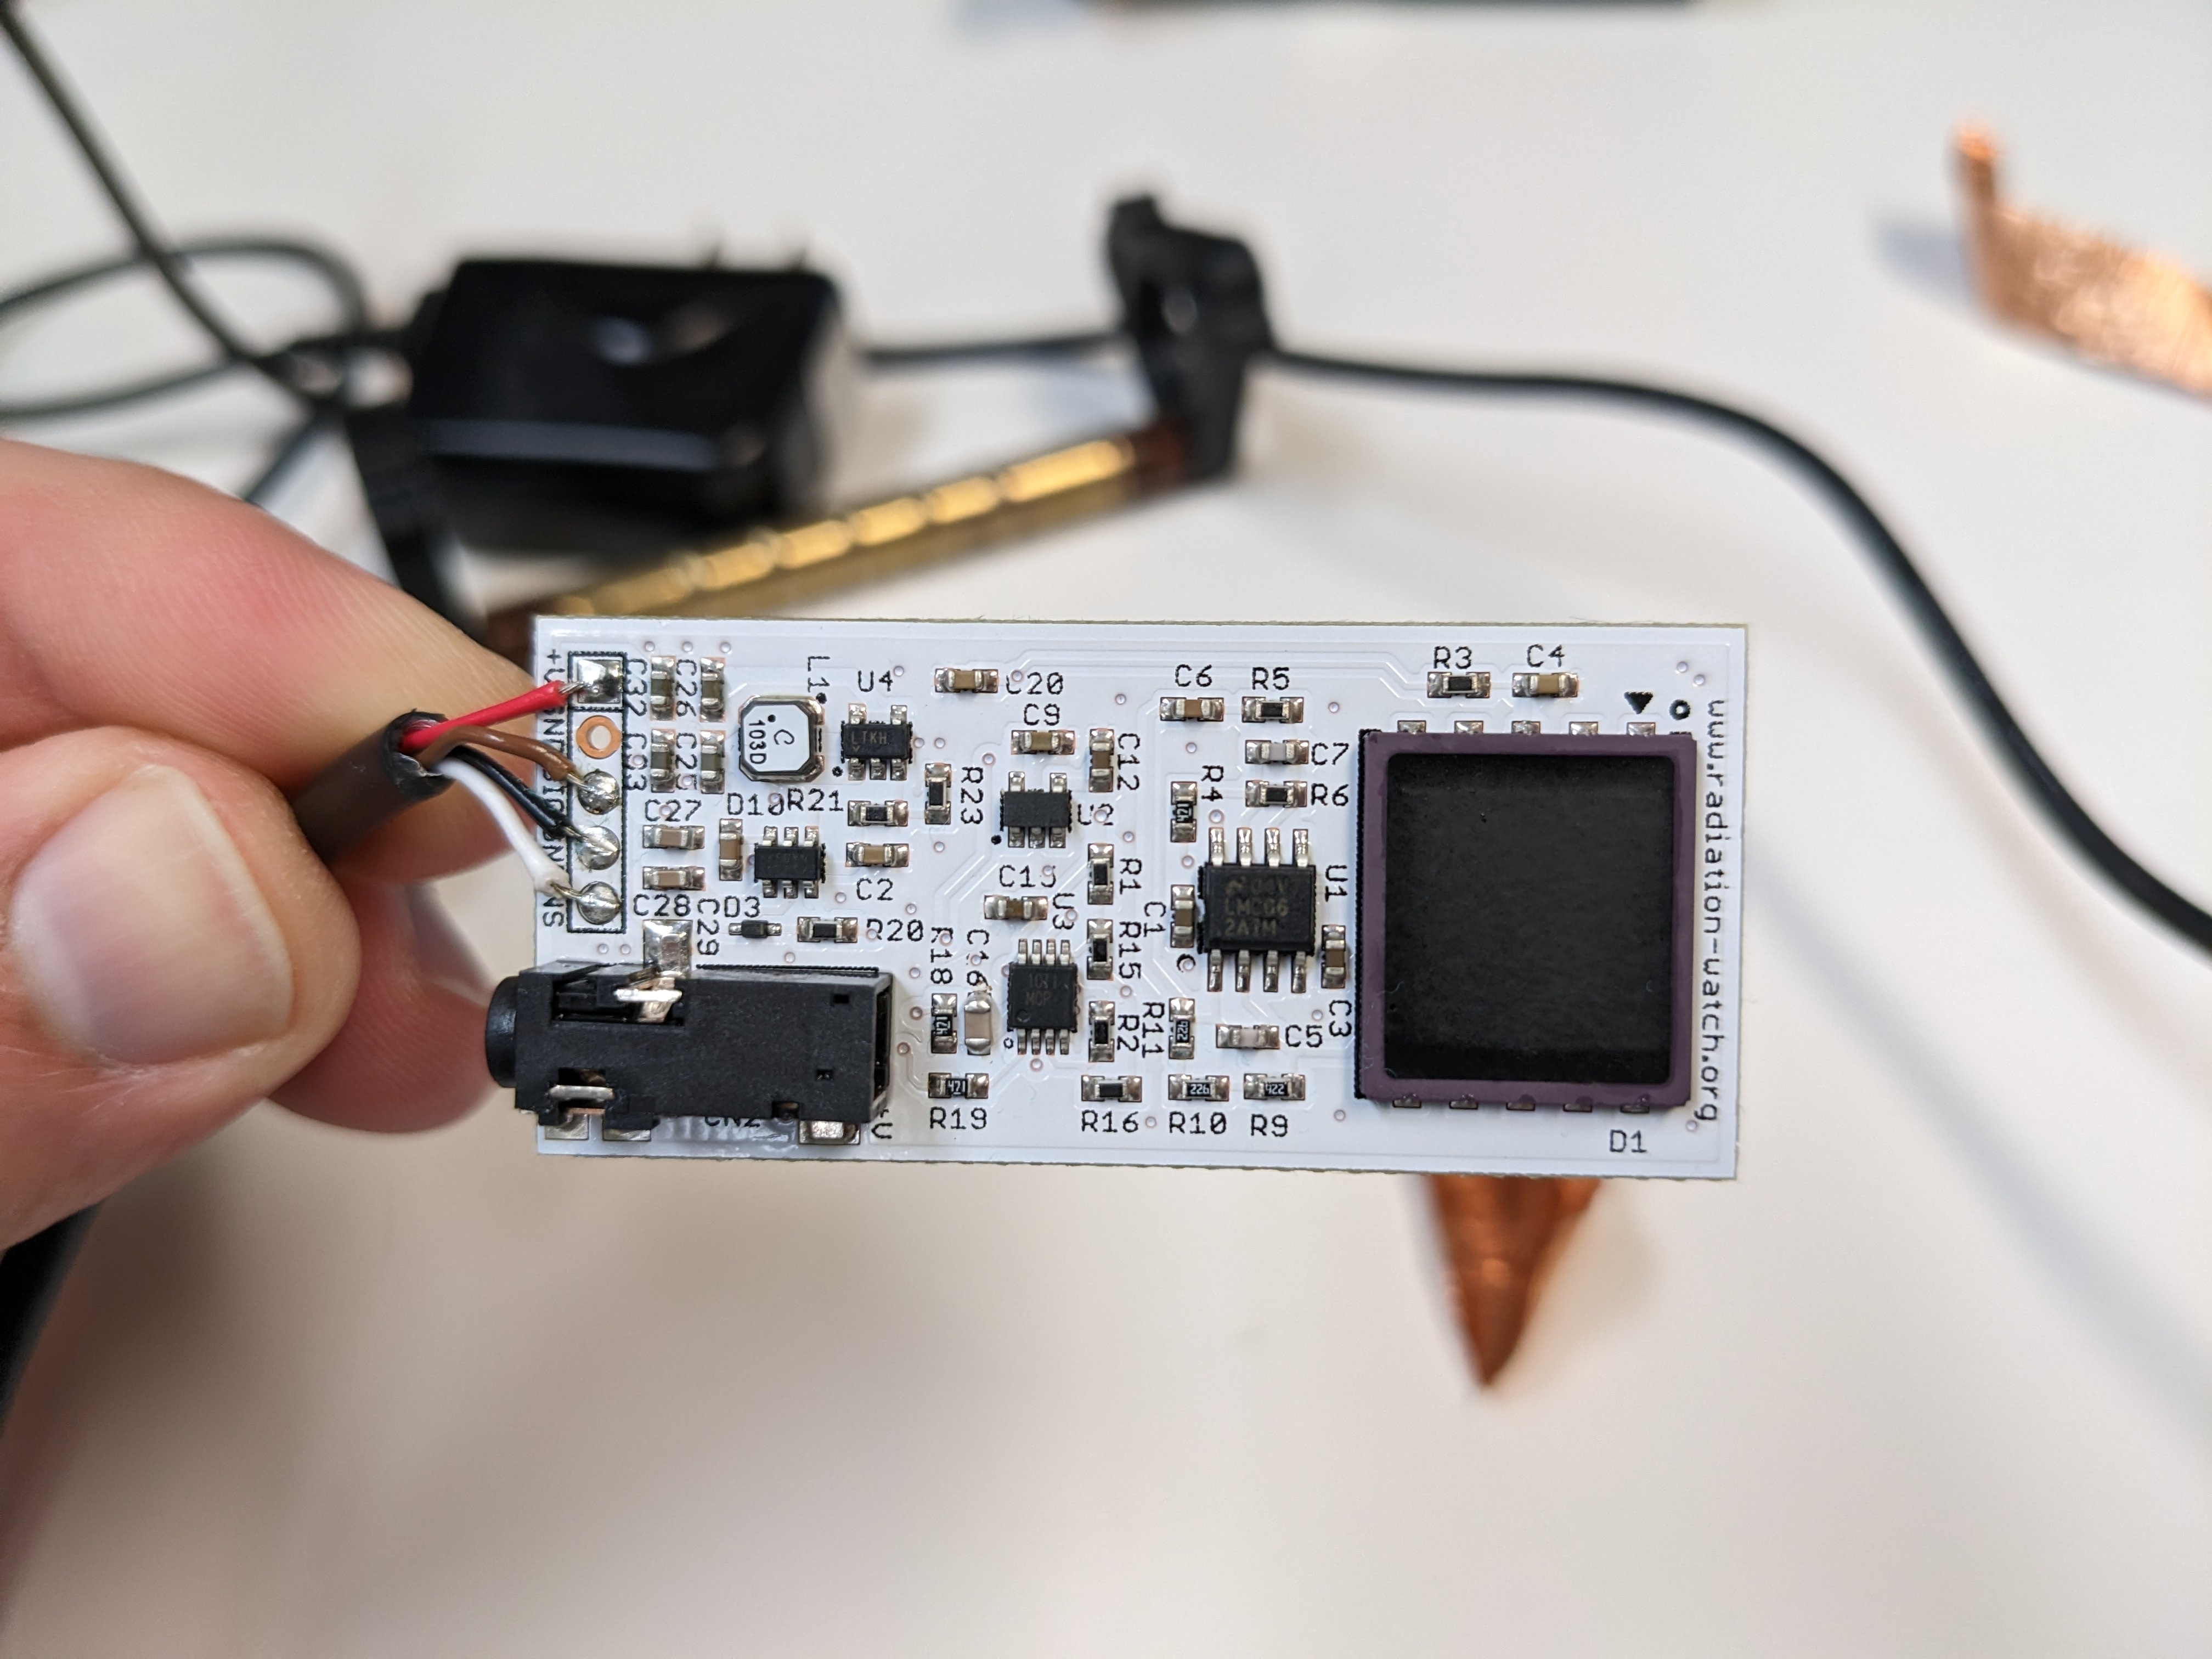
Next, we need some detectors. One will be the geiger tube that I keep alluding to. A geiger tube appears as essentially a small capacitor charged to a high voltage, which every now and leaks a little bit. For the simplest geiger counter, you can put your powered tube in series with a high impedance speaker, and hear the clicks directly. Yes, this is literally where that classic clicking sound comes from, but it's more common to use a couple transistors or something to translate the signal to a level more useful, like to have a microcontoller count the clicks. Geiger tubes can detect beta and gamma radiation (but not the characteristic energy of the particles; it either detects them or it doesn't), and ones which have an extra-thin mica window can detect alpha radiation too.
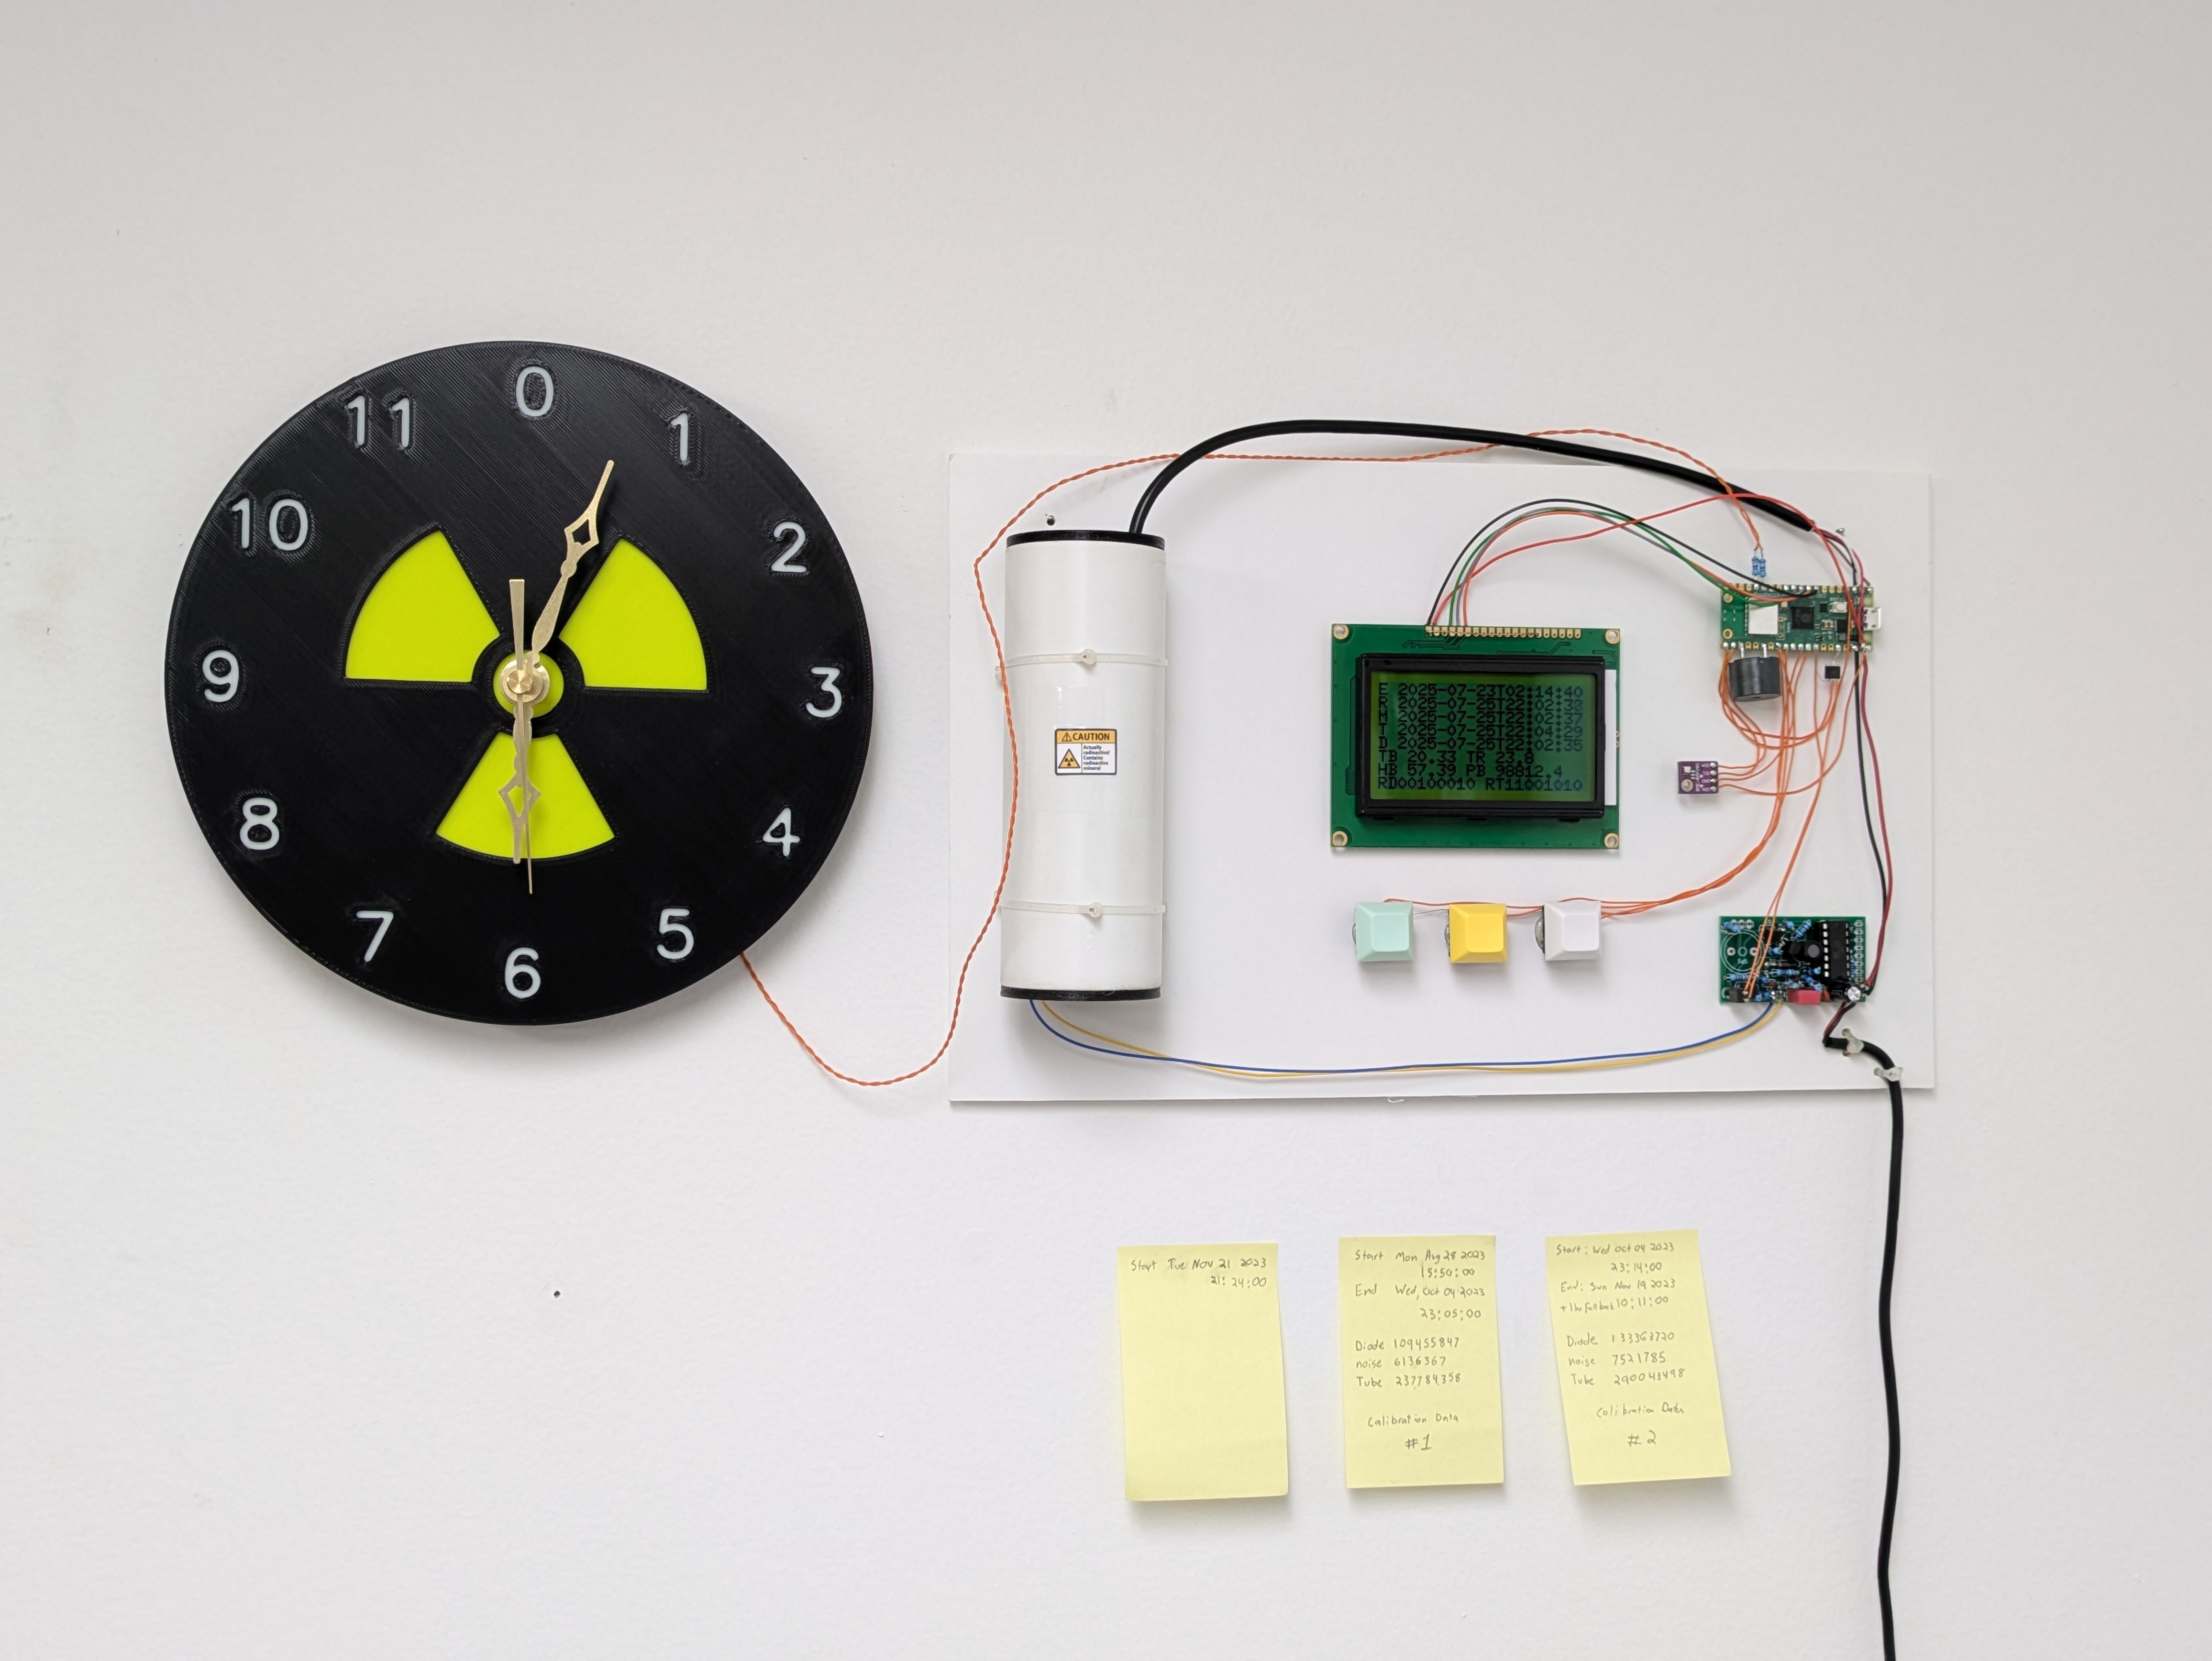
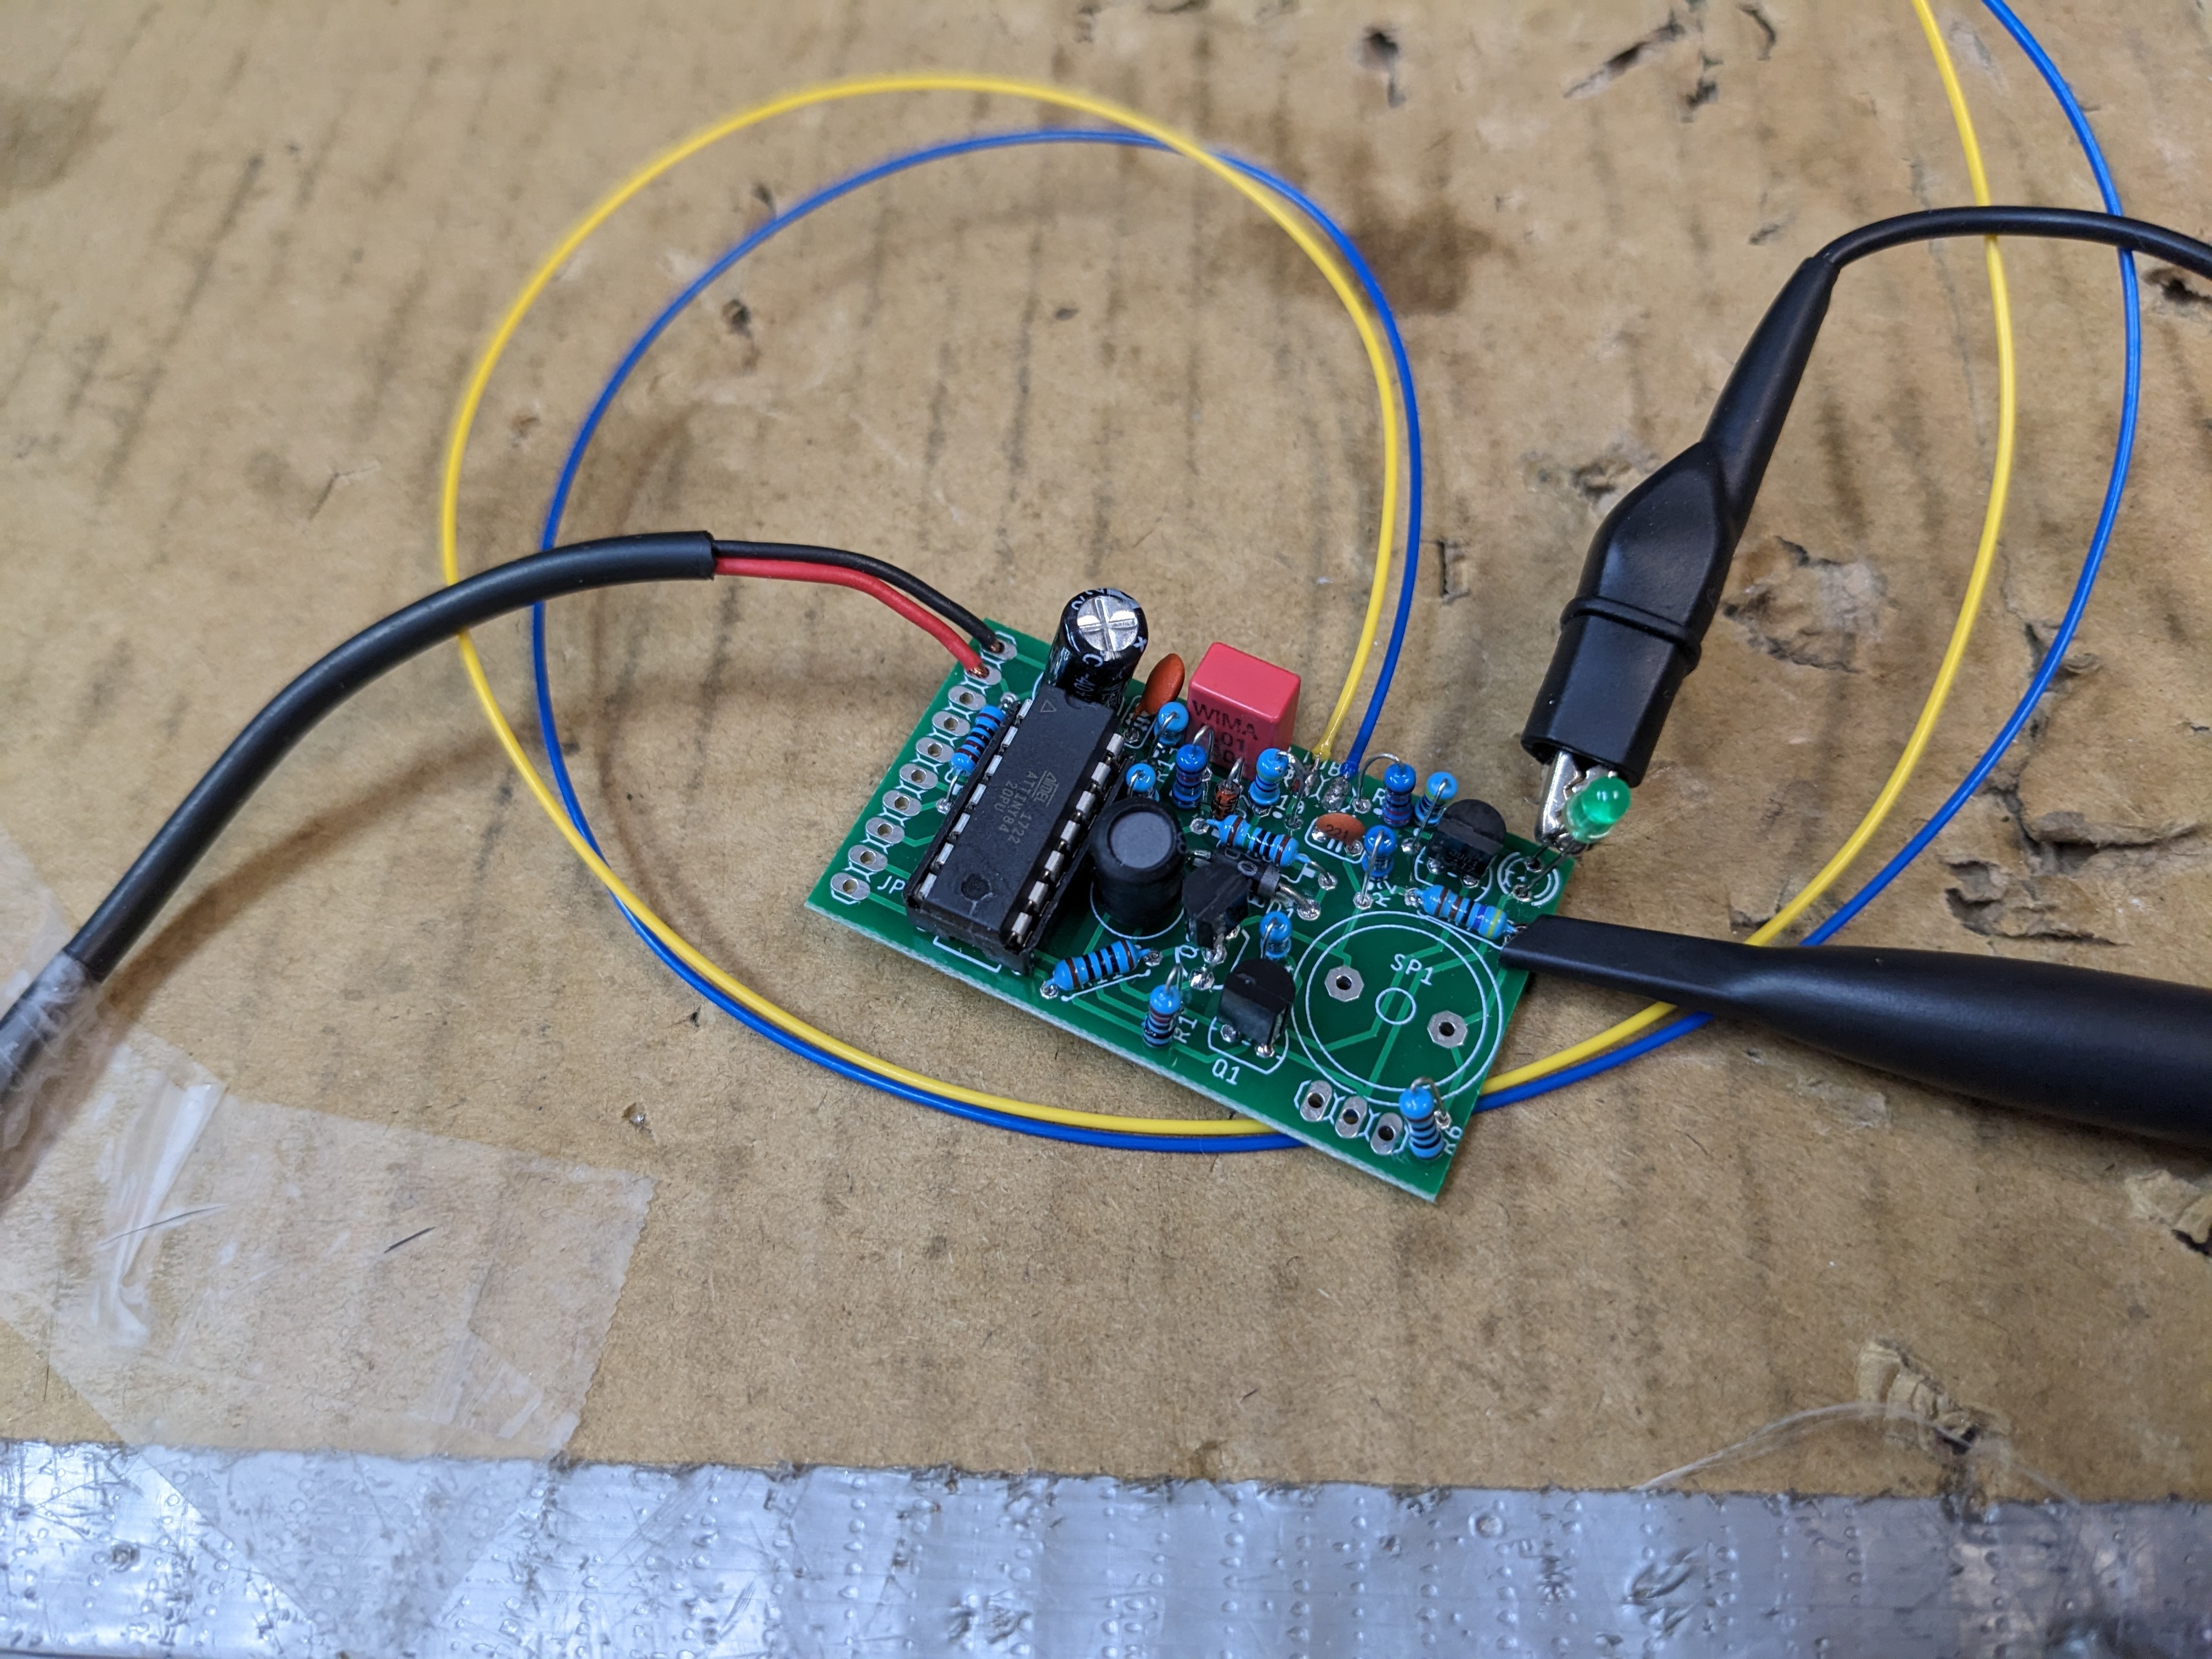
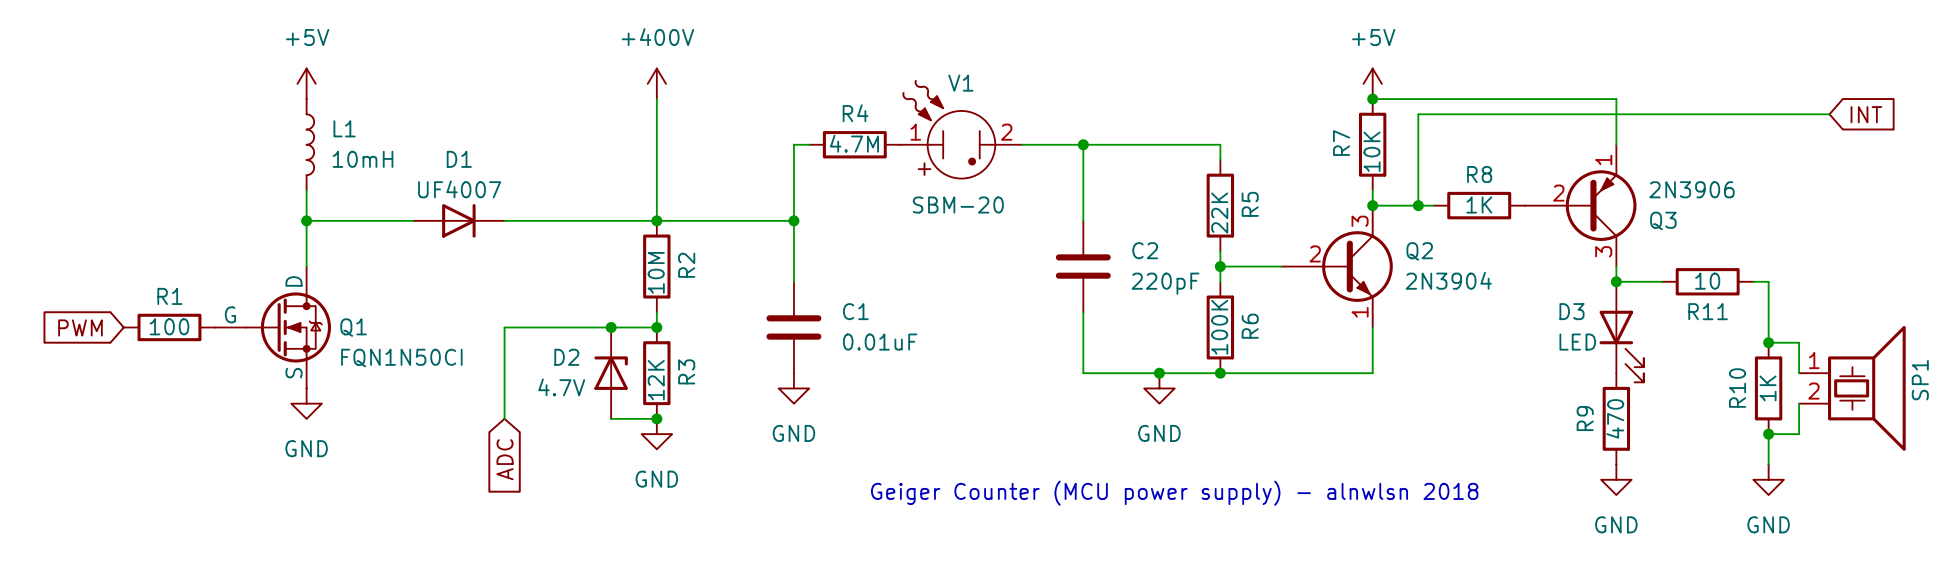
Lucky for me, I have a design for a geiger counter which I made several years ago. It uses the classic and abundant Soviet SBM-20, which is a metal geiger tube running at 400V. It's a pretty standard design to what you'll find out there, but for the 400V power supply, the high voltage goes through a divider into an ADC pin, and it uses a PID loop in software to drive the main MOSFET via PWM. This works well enough to have a stable 400V with an Attiny84 running at 5V, and the PWM at about 4KHz. It's probably not even efficient, but geiger tubes need very little current, and it seems to work regardless. At one point, I made a PCB for it, which can drive a 7-segment display and handle a few button inputs, for a standalone counter, but for today, I only care about the power supply and detection circuitry, so I removed the speaker, and replaced the LED it makes blink with an optocoupler. This goes to an interrupt pin on a nearby Pi Pico W, which is where the counting actually takes place.
I have heard conflicting things about geiger tubes "wearing" or "breaking in"; for whatever difference it makes, I borrowed this tube from another counter which had been powered on for 1 year already, because I'm one of those people who has a bunch of sensors with ESP32s on them littered about the house.
Since I expect this experiment to run for (potentially) years, I wanted to have a second type of radiation detector, just as a second data point. I wanted to do a PIN diode geiger counter, which instead of detecting a gas discharge inside a tube, it detects the tiny current generated when a radiation particle hits a silicon diode, somewhat like a solar panel. This signal is almost absurdly small, so much so that when you go to block the light from the diode package (the diodes only detect radiation in the dark), you have to be very careful not to get any paint across the diode leads, as this will be a low enough resistance to make the signal disappear. I tried building the well known Stuttgart Geigerle design. but I couldn't get it to work, so instead I bought a ready made unit: the Pocket Geiger Radiation Sensor - Type 5. This was a Japanese-built device made in response to Fukushima, designed to be attached to a cell phone headphone jack for on-the-go radiation monitoring (this was years before the Radiacode became everyone's favorite counter). It featured a 1 cm-square (large) X100-7 PIN diode which was pre-epoxied over to keep any light out. Unfortunately, since starting this project, that part was discontinued, followed by the removal of the Type 5 from stores not long afterwards.
The only problem with the Type 5 was that it was designed to alert you to slightly-higher-than-background levels, not scream-directly-in-your-ear levels, which is what we are effectively doing here. It uses a capacitor to stretch out those very short radiation pulses to something that a phone can pick up, but this leaves a recovery time of a few hundred ms, not the microseconds we're looking for. All I had to do here was swap out C16 for a much smaller capacitance. This did involve removing the copper foil tape shielding the sensitive portion of the board, but I replaced it with some fresh tape of my own.
Here is the signal from the Type 5 before (top) and after (bottom) the fix. Note that the bottom is a more 'zoomed out' timescale, as more events now fit on the screen.

The Type 5 also includes a second output for 'noise'. I'm still not exactly sure what this is meant for, but I hooked it to another interrupt pin as well.
Radiation follows the inverse-square law, so for best results you want the source and detectors to be as close together as possible. I wanted something that would hold everything together securely, and be reasonably sealed so it would contain any specks of the source rock that flaked off, or radon gas produced within the decay chain. But, it should also be removable in case I wanted to change something in the future, so no sealing the whole thing in an epoxy cube here. Most importantly, it should be secure. The last thing I want is to measure this thing for half a year and bump it accidentally which moves the rock or one of the detectors, and I'd have to start all over.
I eventually came up with a series of TPU printed rubber inserts, which would press fit into the inside diameter of a short piece of PVC tube, and hold the rock, diode counter, and tube in position. I made some end caps for the tube out of TPU also, with some holes for wires. Note that only the geiger tube was inside the PVC tube, I decided to have the rest of the circuitry outside to avoid needing to open it again.

Finally, I attached a sticker to the outside. Probably the only time I'm going to use the radiation symbol legitimately.

For what it's worth, I have one of those digital radon meters in the same room (which also contains most of the small amount of other radioactive items I have), and it measures in at 0.64 pC/L, well below the action level for radon of any country.
This might be the only clock out there that produces random numbers as a byproduct of its operation. You know, just to remind you that radiation is a truly random event.
How it does so is exactly the same way John Walker's famous HotBits project worked, and relies on the fact that no one knows exactly when an atom will decay. Walker used a commercial sample of Cesium-137 with a half life of 30 years, and it turns out a rock with a billion year half life works a lot slower. Walker claimed to get 100 bytes per second with his setup; mine gets more like 30 bytes per minute.
Consider how rare it is for a single atom of U-238 to decay. Suppose that you have one on your desk, and you watch it for a year. What is the chance that in that year, you will see it decay? In fact, you actually have a better chance of walking into a casino, putting a $1 bet down at the roulette table, making a series of consecutive winning bets, and walking away a billionaire. Again, if you're handed any old atom, it's decay date is completely random. It could decay 4 minutes from now, or in 30 billion years. The really bizarre thing is that if you are handed two atoms, one produced yesterday in a reactor, and one known to be 10 billion years old already, you can't even say which one is likely to decay before the other, in the same way you still can't predict a fair coin is "about to" come up tails even if it just flipped heads five times in a row. But the thing is, if you remember the number 6.02x10^23 from chemistry class, then even a few grams of something contains many million trillion atoms, so there are plenty of them decaying right just now at any given time regardless. Of those, their decay particles will travel in a random direction, so some will fly away from the geiger tube, and some will intersect the tube but not get detected. Some others will be detected by the diode geiger counter instead. But even with all that, this happens often enough that the tube detects something more than 60 times per second.
To use this to make random numbers, whenever the interrupt fires from a radiation click, you make note of the value of a running timer - I'm using the arduino micros(). Do this 4 times, and it will give you two completely separate and isolated intervals of time. If interval A is longer than interval B, that's a 1, and opposite that for a zero. The collected bits are then packed into bytes, and when I've collected a buffer of 32 of them, I have the Pi Pico W send out an MQTT message. Then, a listener program collects this and stores it on disk. I didn't quite know what to do with the random number after collecting them, so I decided to publish them to my website. This is done whenever I collect 1K of random data, which happens about every half hour. The random data from the tube counter actually uses every 2nd tick of the interrupt, to better match the rate of random data that comes from the diode counter. In hindsight, I'd rather have had the tube run at its full rate, but doing so now would interrupt the experiment.
I've collected around 16Mb of random data. How random is it? Walker's own ENT utility gives this report for the tube:
Entropy = 7.999983 bits per byte.

Optimum compression would reduce the size
of this 10896448 byte file by 0 percent.

Chi square distribution for 10896448 samples is 252.14, and randomly
would exceed this value 53.88 percent of the times.

Arithmetic mean value of data bytes is 127.5498 (127.5 = random).
Monte Carlo value for Pi is 3.140889633 (error 0.02 percent).
Serial correlation coefficient is 0.000394 (totally uncorrelated = 0.0).
And for the diode:
Entropy = 7.999962 bits per byte.

Optimum compression would reduce the size
of this 4998304 byte file by 0 percent.

Chi square distribution for 4998304 samples is 261.52, and randomly
would exceed this value 37.61 percent of the times.

Arithmetic mean value of data bytes is 127.4593 (127.5 = random).
Monte Carlo value for Pi is 3.142226757 (error 0.02 percent).
Serial correlation coefficient is 0.001270 (totally uncorrelated = 0.0).
...which seems roughly on par with HotBits.
This step is just to figure out how many clicks are measured in some amount of time, to get a rate from which I can extrapolate and calculate the time. For best results, I assembled the project on a random piece of plastic sheet, and hung it on the wall in the corner of my shop, where it is unlikely to be bumped or otherwise disturbed.
The count part is easy, it's part of the ISR I set up inside the Pi Pico. An int64_t is incremented by +1 each time the ISR fires.
The "some amount of time" part is a little harder. At this point, I had only wired up an LCD display, and a couple of buttons for the user to press. For this first calibration, you just push one button to start the count, and another to stop it. But, how to do this accurately over the course of several days or weeks? I wanted this to span maybe a month, but be accurate down to the second. Should you trust your PC's clock for this? How about your phone's stopwatch? It's probably good enough for whatever I'm trying to do, but I was setting up my shortwave radio stuff again anyways, so I strung up an antenna and tuned my tube radio to 10000 Khz, which is WWV. Now there's a clock that you can be sure is as correct as you're going to get.
Throughout 2023, I noticed that whenever I tuned in, the nixie clock I had in the room was always correct and in lock step with the radio. The nixie clock updates itself every 10 minutes with the system clock of my local server. This is excellent news; it means I can probably rely on the server to receive data from the experiment and have correct timestamps.
The manual start/stop without logging ended up being a much bigger problem, because of power fluctuations my area experiences. 2023 was a particularly bad year for this. The power would usually be out for less than a second, but this was easily long enough to reset the Pi Pico, losing the current count. This was partially mitigated by publishing the current status on MQTT once per minute, but mostly resolved once I added a surplus 120V UPS, even though the power supply on the clock is just a 1A 5V wall adapter. I do have a 12V UPS which runs off a small lead-acid battery, which should last a lot longer, but again, installing it requires me to reset the experiment. The 120V UPS turned out to not be quite enough either, as the unit would sometimes lock up as the UPS's relay switched from wall power to the internal inverter. I added a soda-can-sized low voltage capacitor from an old linear power supply I happened to have to the 5V rail, which solved the issue. The only downside is that if power is completely lost, the now incredibly slow rise time of the 5V rail will not properly reset the Pi Pico, and it will never start properly. I have to manually reset the Pi Pico via shorting the reset pin to GND when this happens.
Regardless, I collected two "full" data sets while the experiment was still in the manual start-stop configuration. These are:
Calibration Run #1
Start: 2023-08-28 15:50:00
End:   2023-10-04 23:05:00 (3222900 seconds)
diode count: 109455847 (33.961912 s^-1)
noise count:   6136367 ( 1.903989 s^-1)
tube  count: 237784358 (73.779626 s^-1)
Calibration Run #2
Start: 2023-10-02 23:14:00
    +1 hour daylight savings
End:   2023-11-19 10:11:00 (4103820 seconds)
diode count: 133363720 (32.497458 s^-1) -4.31% change from #1
noise count:   7521785 ( 1.832874 s^-1) -3.73%
tube  count: 290043498 (70.676466 s^-1) -4.20%
Uh oh, run #2's count rate was about 4% lower for some reason. Maybe this idea isn't going to work after all. What sort of errors might we expect in this setup? Not much is going to change the actual rate of decay, but maybe temperature or pressure might affect things. If it affects the detectors themselves, I'd probably have expected a different change in the tube and diode counters, but they are both around 4.2%. The temperature and pressure does change the density of the air though, and the PVC tube is not airtight. Could this have had an effect on the count from the tubes? Maybe, but I also might have just written the number for the time down wrong somehow. The only evidence for these runs are scribbled on a sticky note. Maybe we should have listened to Charles "I wish to God these calculations had been executed by steam" Babbage after all.
We won't have to wait long, because after cal run 2 I improved the Pi Pico firmware to send and receive MQTT messages over WiFi. Now, to start a new run, I can just send an MQTT message with the current time, and the system will automatically reset all the counters and start over. Periodically (once/minute) the Pico also sends out a status report, containing the current count of both detectors, as well as what it thinks the current time should be based on the counts. All of which gets logged by my server PC, and some of which I also publish live on my website so that those of you playing at home can watch, too. I can also send in new calibration data via MQTT; if I decide to adjust it later, I won't have to update the firmware.
I also added some new hardware. There is a BME280 temperature/pressure/humidity sensor so the room's environment could be measured. Perhaps a corelation with one of them will be apparent. I also added a DS3232M RTC chip. This is just in case I lose trust in the timestamp the listener computer adds to the report when it comes in; the report will always contain a timestamp from the RTC, which is spec'd to be good to +/- 5PPM. The RTC also has another temperature sensor.
Once this was done, I was ready for another run, which was done in the early months of 2024. I accidentally let this one run for 2 months instead of just 1, but this is the sort of project where it's better to forget about it for weeks at a time.
Calibration Run #3
duration   : 5529557 seconds
diode count: 187643047 (33.934553 s^-1) -0.08% change from #1
tube  count: 408074272 (73.798727 s^-1) +0.03%
Now, I'm more willing to believe that run #2 was a fluke. There's a less than 0.1% change from run #1, which seems pretty good (but is probably horrible accuracy for actual clock makers). Whatever, it was now time to do a much longer run.
This is the easiest part. You just wait. This is the type of project that actively benefits from you doing nothing to it for long periods of time!
To monitor the progress, we have the status webpage, but also the LCD that's on the device itself.
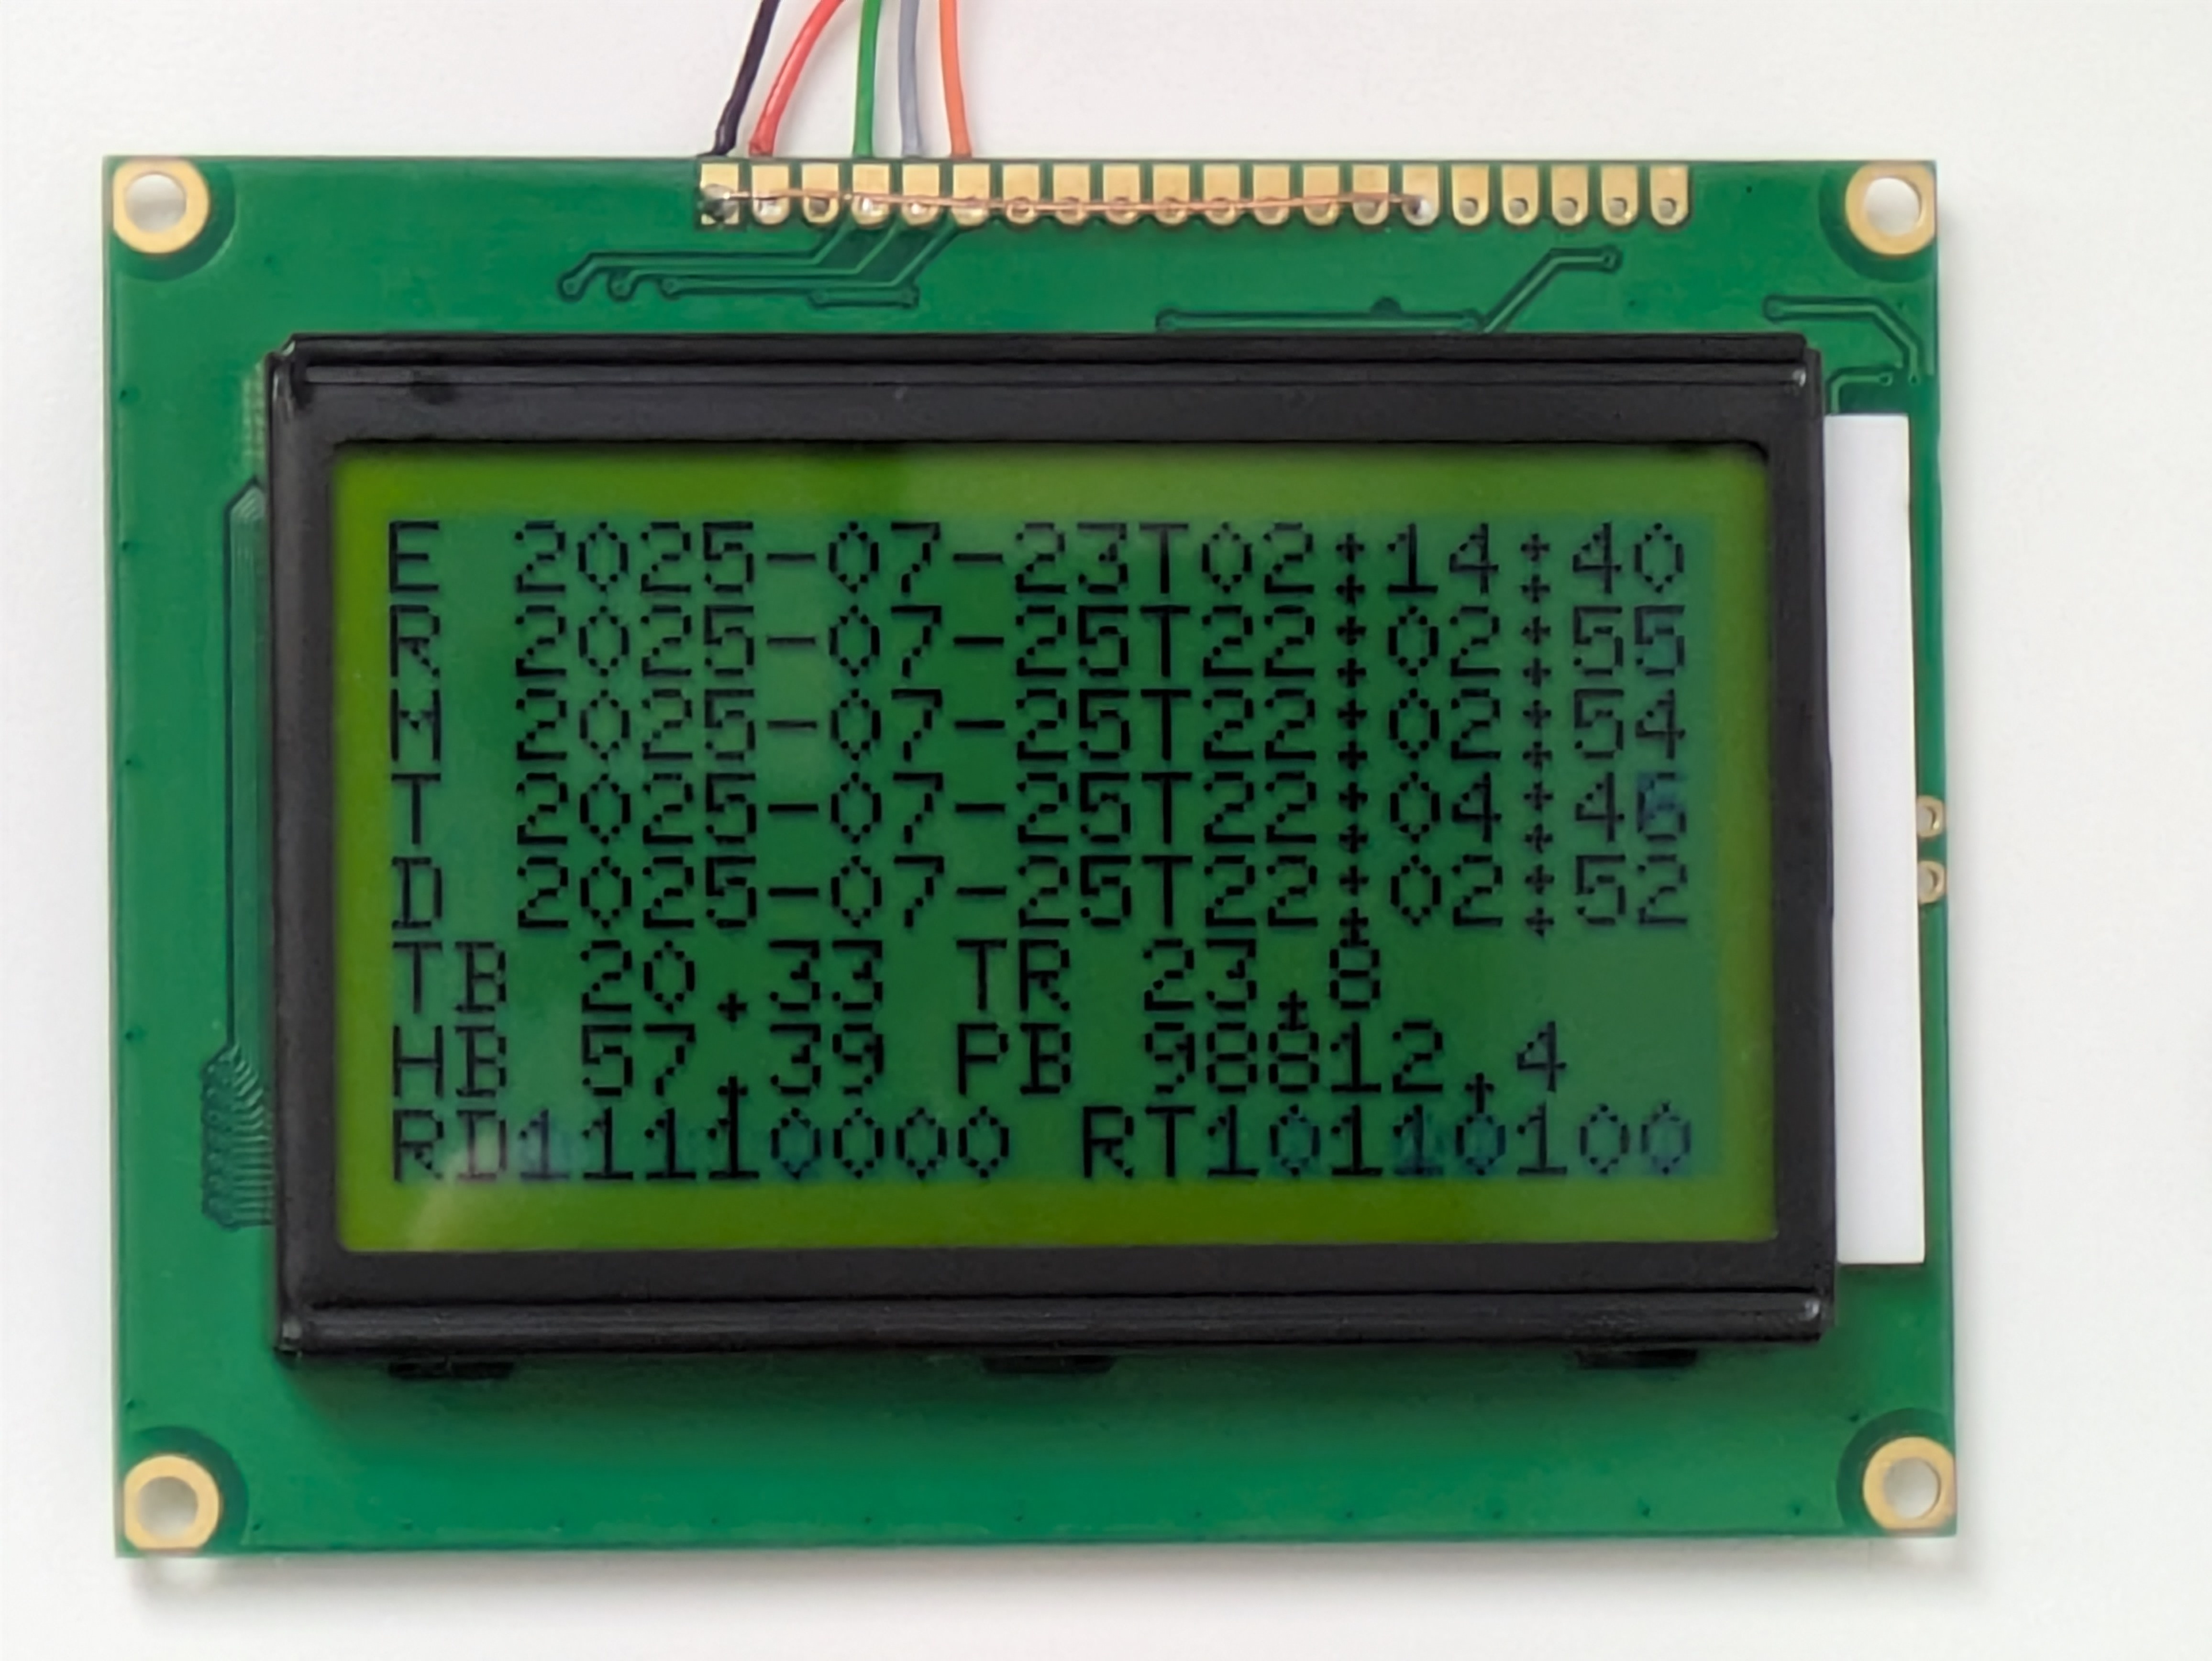
It shows the start time (epoch -E), the time from the RTC (R), the time according to the arduino millis() (M), the time according to the geiger tube count (T), and the time according to the diode geiger counter (D). The pressure, temperature and humidity from the BME280 and RTC are on there too, and at the bottom, random number bits from the two detectors are shown live as they are created.
The 1 year run lasted from March 2024 to March 2025. A few days after the year was up, the clock inexplicably locked up, and after a reset, I could not get the clock to run for more than a week. Eventually, I figured out that if the wifi disconnected, it was not reconnecting like it was supposed to. The problem was fixed by removing an errant WiFi.disconnect() and then it worked perfectly, but it makes me wonder how it even lasted the full year! I did change out my router around this time, so it could have been that.
At the 1 year mark, the status was:
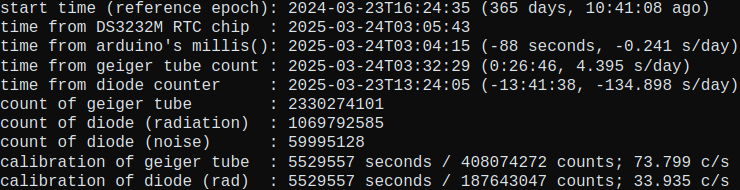
2024 Year Run
start  : 2024-03-23 16:24:35
end : 2025-03-24 03:05:43 (31574468 seconds)
diode count:  1069792585 ( 33.881471 s^-1) -0.156% change from
calibration run #3
tube  count: 2330274101 ( 73.802481 s^-1) 0.005%
The diode clock was behind by about half a day, but the tube clock was only off by 27 minutes, or about 0.0051% of a year! That's the same as 51PPM, or 10x worse than the stated accuracy of the DS3232M RTC chip. Still, if I was trapped in a cave with just this clock, I'd consider even the diode clock estimate to be pretty good after a year. Remember, both of these measurements are without any external reference except the start date.
That one data point hardly tells the whole story though. Here's what was happening over the course of the year:
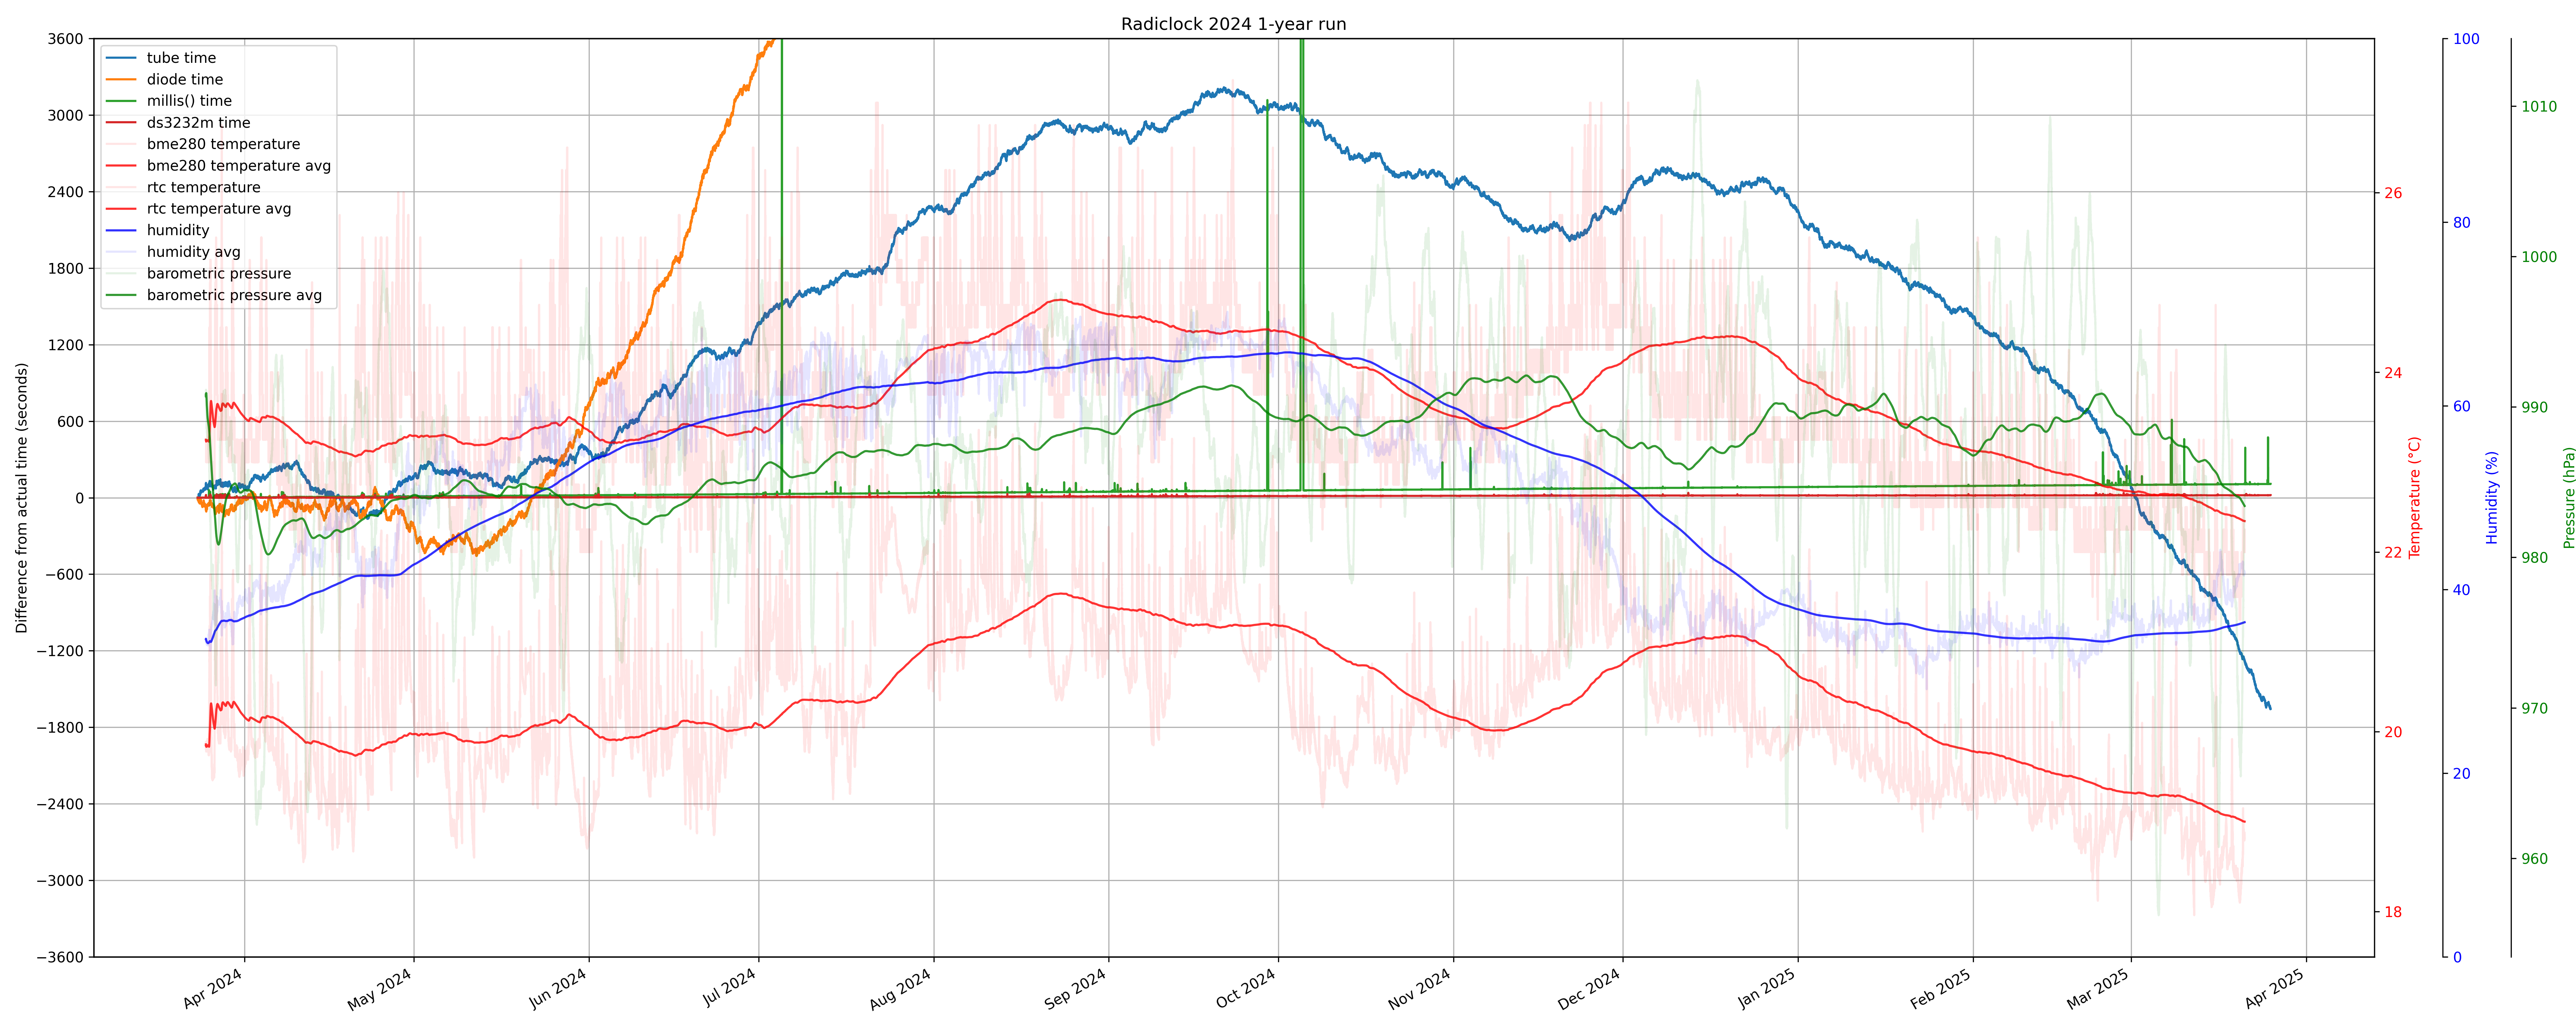
The blue line is the tube counter clock. Incredibly, throughout the year it had drifted off by as much as an hour, before then drifting the other way, until it passed the correct time and started moving ahead. One thing that stands out immediately is the tube clock's corelation with the smoothed out average temperature line (2 red lines). A 3 degree C offset between the BME280 and RTC thermometers is apparent, but the general shape lines up under the tube clock line pretty well. Maybe a possible temperature compensation is in the future? The clock is kept in the basement shop, which is much more stable environment than an outdoor garage, but still varied by about 8-9C in a year. The other thing I could do is to put the whole experiment in a heated, temperature controlled chamber, which would create an OCXO (or would it be an Oven Controlled Geiger Oscillator?).
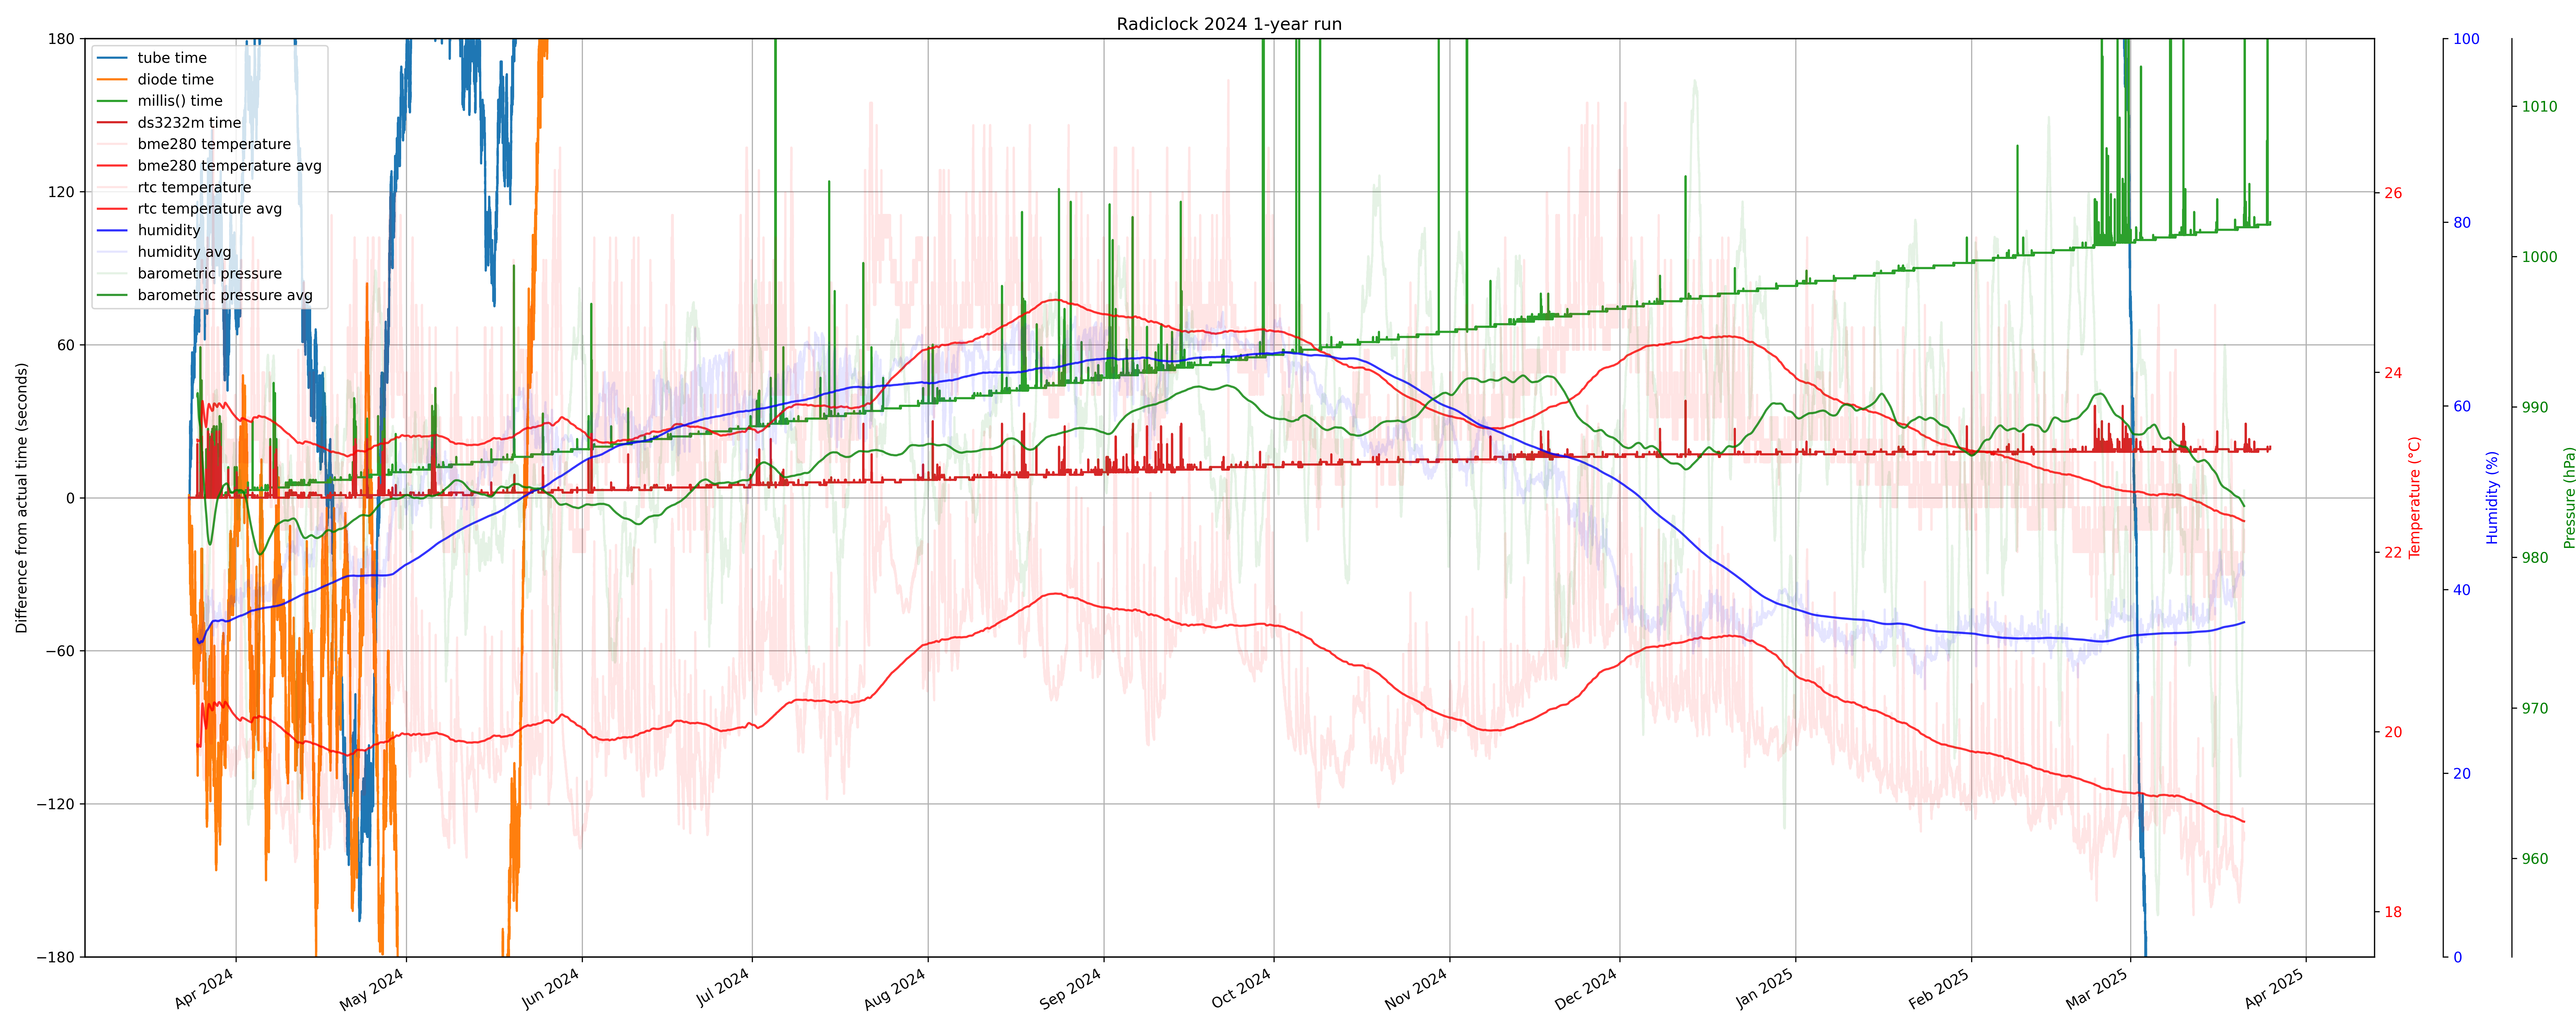
The diode clock (orange line), meanwhile, drifted off by several hours. Here's a more zoomed out view of it:
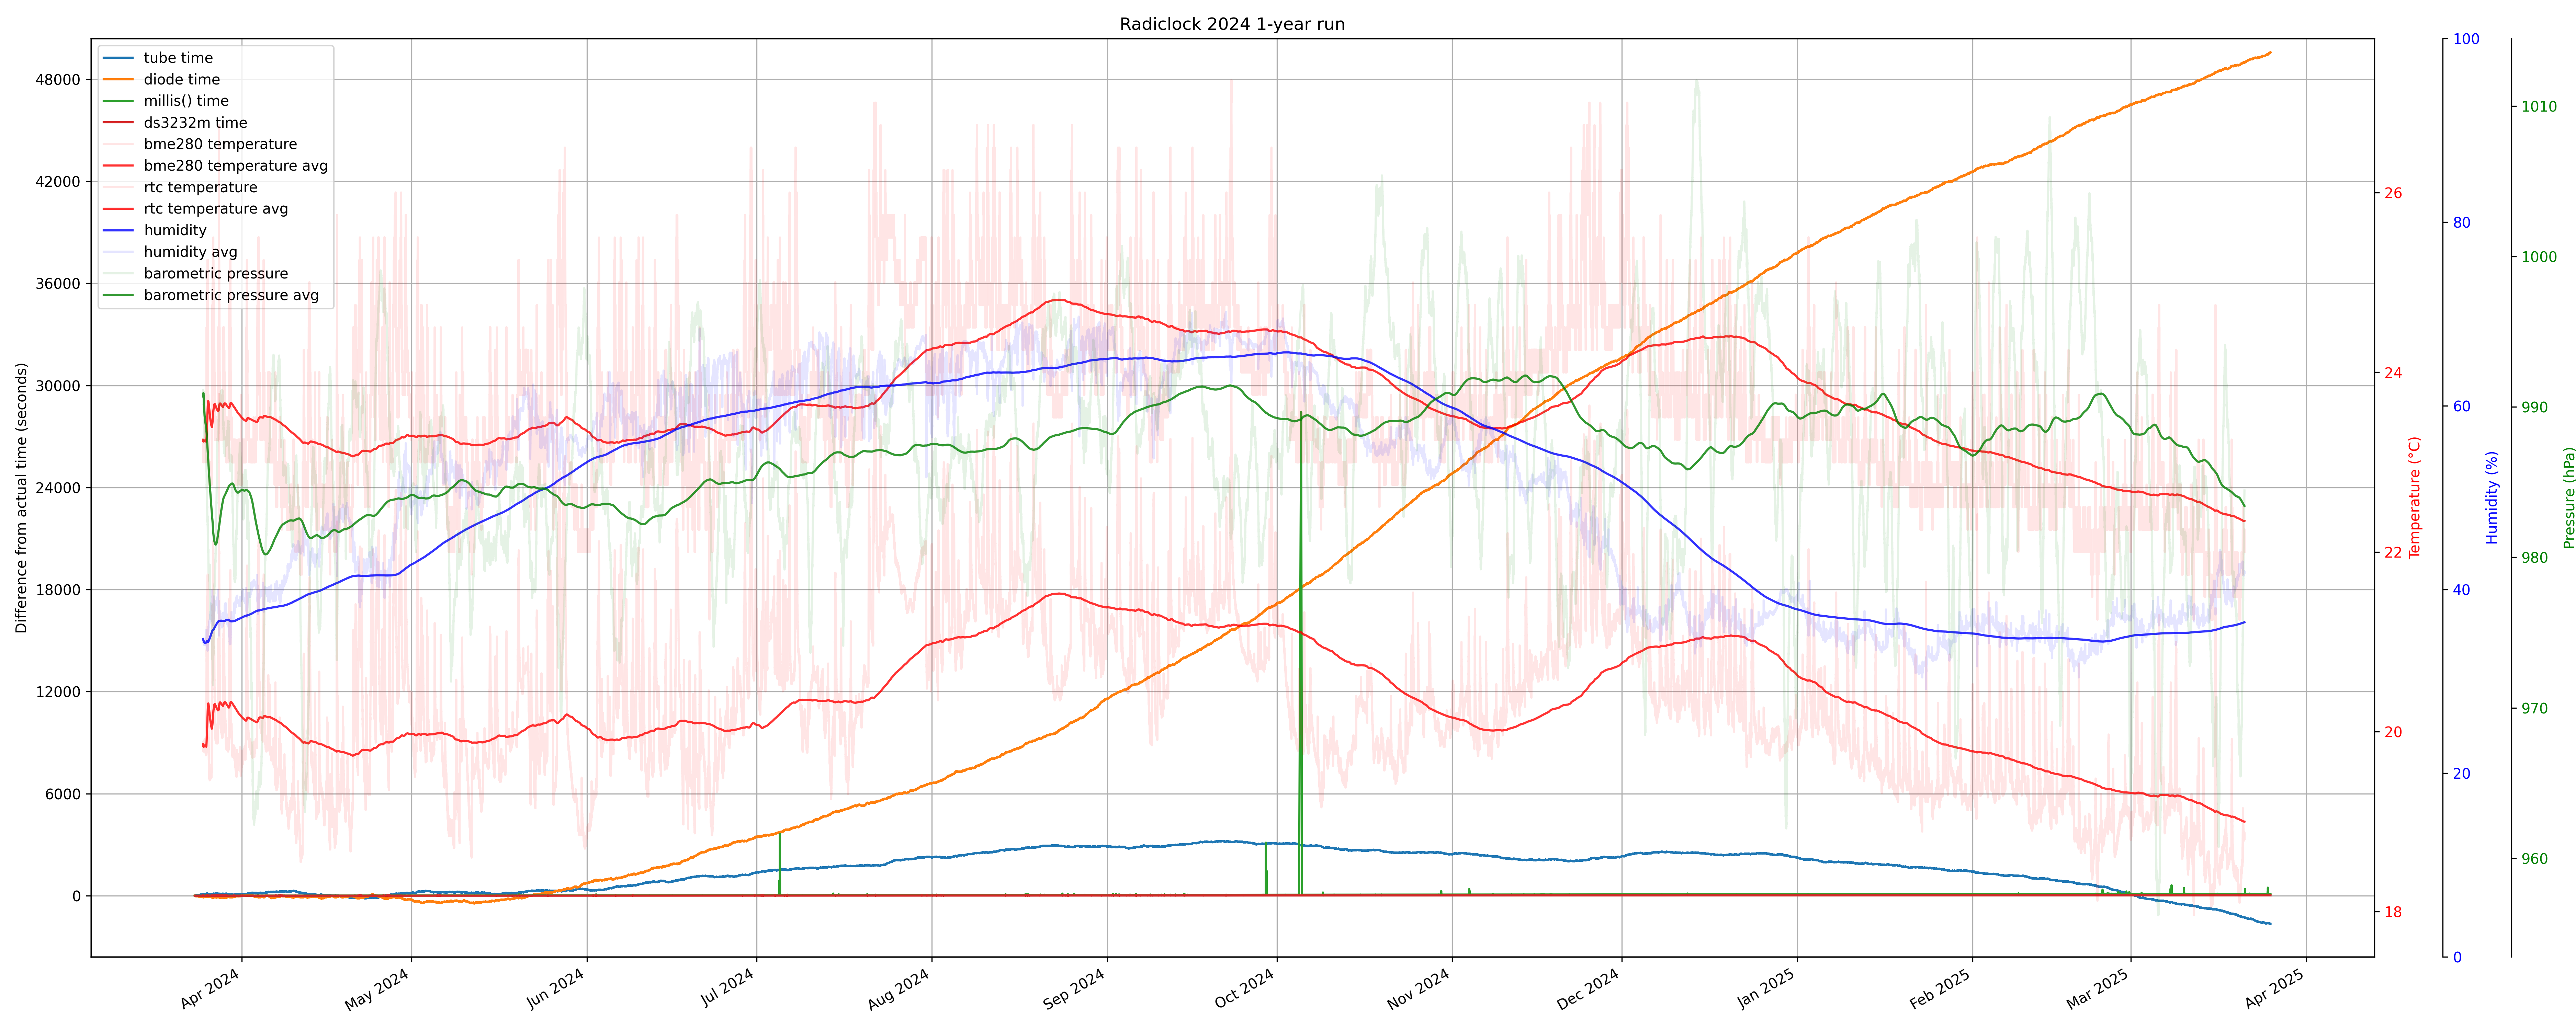
I also tracked the time based off the DS3232M RTC, and the internal millis() counter. Zooming in:
The keen-eyed among you may realize that I didn't actually make anything yet that does something at 1 Hz, I just made a fancy counter. At an average rate of 73.80 counts/second, how do you even divide that into equal seconds? My answer comes in how I scale the counts.
I don't just do seconds = count * 73.80, instead I use integer math, and use the full calibration vales I have:
int64_t count = 0; //increments from ISR
int64_t start_unix = 1753493295; //unix timestamp of the start date and time

#define calibration_count 2330274101
#define calibration_seconds 31574468

loop(){
    int64_t elapsed_seconds = count * calibration_seconds;
    elapsed_seconds /= calibration_count;
    int64_t current_time = start_unix + elapsed_seconds;
    log(current_time);
}
The output here is a unix timestamp in seconds, with no errors from floating point math. To get the seconds, I just keep looping and watch for the current_time value to change. I normally just log this value and display it on the LCD, but for more fun, I also tick a mechanical clock movement forward one second.

The motor inside every one of these cheap quartz clock movements is called a Lavet motor. It's a type of single-phase stepper motor which has special magnetics so that it only moves in one direction. To drive one, you send the motor coil a signal like this:
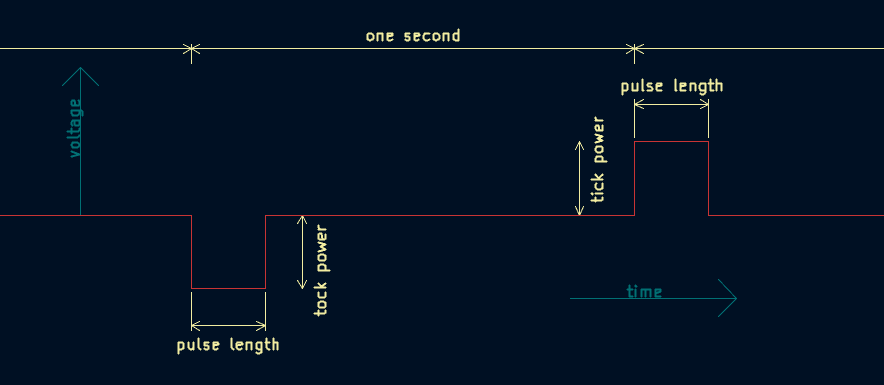
Being so low power, you don't need an external H-bridge to drive the coil, two Pico pins (with a 100 ohm current limiting resistor) are enough. Set one high and one low to drive it one way, both low to send no power and low-high to go the other way.
The only hard part was trying to find the correct value of voltage and pulse length to make the motor run evenly. With too much power or too long of a pulse, the motor will overshoot where it's supposed to go and won't tick at all. Too little, and there won't be enough power to move it.
When I say "voltage" on my diagram above, I really mean PWM duty cycle. For some reason, this took the longest to figure out, though it should have been obvious: the clock motor runs fine at about a volt, and the Pico runs at 3.3V. So a duty cycle of about 33% was what was needed. I even replaced the first clock motor I was using, which never worked well, only to see the same issues in a brand new one before figuring out to turn down the PWM.
For the length of the pulse, I found 50ms to work pretty well. This is too short of a time to be derived from the geiger counts, so I used the internal millis() timer for it. But the decision for when to send each pulse is still determined by when the scaled integer seconds count from the geigers increments, so the clock is still radiation controlled.
Later, I realized that the pulse time in the real clock is likely a power-of-2 fraction of a second, probably 31.25 or 62.5ms, since all these clock movements derive the 1Hz motion from a 32768 Hz crystal through a series of divide-by-2 flip flops.
So, how well does it work? See for yourself:
It does tick a little unevenly, not as much as a Vetinari Clock, but it's apparent if you pay close attention. Since my own measurements of the rate say that the typical counts/second doesn't often vary by more than a few percent in any given second, the unevenness here is probably just a result of the integer math. It remids me of Aliasing in graphics, but since I just have to take the seconds as they come I'm not sure what I can do about it.
If you're wondering about the "geiger counter noise" that it makes in the video, this is just something I do when the clock is at the top of the hour. Cookoo clocks have a bird that comes out, and digital watches can beep on the hour. It's just a reminder that the experiment is still going. The ISR is allowed to directly toggle a pin which has a speaker attached, so the sound you hear is clicking from the actual geiger counter. Of course, since the clock drifts so much throughout the year, you sometimes hear it on the half hour, or really at any time. In the above video, I didn't have the minute hand quite aligned properly with the top of the hour.
Only because you asked! I'm not sure why everyone seem to call "0" as "12" when it comes to clocks. Does it really make sense for 12am to come before 11am? Any child can point this out, but apparently our "wrong" version is the one everyone uses. Every other gauge or dial starts at zero, except for clocks for some reason. I've patched this obvious bug in mine, we just need to wait for the admins to merge these changes into the mainline.