RC Wheelchair 2: Difference between revisions
| Line 23: | Line 23: | ||
* derives wheel speed using two quadrature encoders | * derives wheel speed using two quadrature encoders | ||
* manages nrf24l01 radio for communication to remote control | * manages nrf24l01 radio for communication to remote control | ||
All that is left is a handful of power supplies to operate the radio and microcontroller, and some programming. | |||
Revision as of 22:33, 17 May 2019
After my attempts to modify the settings of the existing wheelchair controller I accidentally erases all the board settings and was left with an inoperable board. Since it is almost impossible to locate the correct file for my particular controller, I decided to construct a new motor controller. This would give me the added advantage of full control over each wheel motor, and I could write all my own control algorithms (though these do not necessarily come easily).
1 - DC motor controller (H-bridge)
Like the original wheelchair, I needed to operate two 24V DC motors. I was not sure of the amperage, but I know that the batteries have an inline fuse for 12A, and that the original controller operates with just 4 single TO-220 mosfets on each motor (part numbers indicated rated for 30A). I couldn't test the motors under load very easily without a controller, so I estimated that a motor controller of 20-30A would do the job.
The style of motor controller, in both the original wheelchair controller and my replacement is known as an H-bridge. In simple terms, it is a circuit using four switches, which allow you to connect and disconnect either terminal of a DC motor to either + or - of a battery. In this way, you can make the motor run in either direction, and even control the speed by turning on and off the switches really fast.
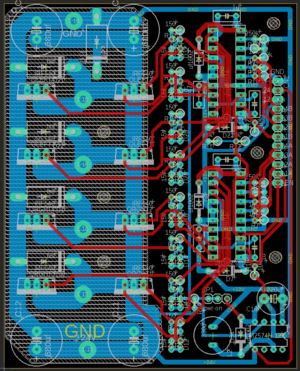
I bought a cheap Chinese h-bridge board but it failed almost instantly, so for my next attempt I decided to roll my own. I based my design on the open source Robot Power OSMC, with some changes. Firstly, I reduced the number of power mosfets by 1/4, since the original OSMC is rated for 160A, and I didn't need anywhere near that much power. So, instead of 4 mosfets on each branch, there is just one. The rest of the controller remains the same, which mostly consists of the HIP4081A mosfet controller. Next, I doubled up the controller, adding a second channel so I could drive a second motor. The last step was designing a PCB, which was straightforward except for the traces which would carry the high motor current. Since I wanted to use a cheap PCB service with correspondingly thin traces, I left off the solder mask on those parts (exposing the bare trace), and then filling the entire trace with excess solder, which has proved to work fine.
The resulting board works fine, although there could be some improvements to improve the board layout (this is only the second board I have designed, ever). Additionally, the board lacks seperation for the logic power and motor power, forcing me to add it in later when I realized I still needed the board powered even when I wasn't using the motors.
Eagle files for this board can be found here: File:Wchmotor2-eagle.zip
2 - DC motor controller (Supporting components and processor)
More than 2 H-bridges are needed to operate the wheelchair. Each motor has an electromagnetic brake, so to be able to run the motors you must first apply power to the brake which will disengage it. I solved this by using a relay to apply power to the brakes. In addition, the same relay allows power to flow into the H-bridge. Therefore, no power can get to the motors with the brake on. This also serves as a safety feature of sorts, de-energizing high power parts of the circuit when they are not being used. Another, smaller mosfet allows a microcontroller to switch the relay.
For the microcontroller, I used an ATMEGA1284P with the Mightycore arduino compatible firmware. This particular chip has plenty of IO pins, and enough PWM pins that aren't also using timers used by other functions of the chip. This makes it much easier to, say, change the PWM frequency and see how the motors perform, maybe even eliminating the PWM noise the motors make (though I haven't tried that yet). Basic functions of the microcontroller are:
- turns on the relay (disables brakes and applies power) when motion is requested, and turns it off after a timeout when no motion is requested
- provides PWM signals to the H-bridge (allows control of power to the motor from 0 to 100%)
- calculates on the control algorithm (in first version, just a feedforward that adjusts power to each motor, in second version, this plus a PID controller that acts on measured motor speed)
- derives wheel speed using two quadrature encoders
- manages nrf24l01 radio for communication to remote control
All that is left is a handful of power supplies to operate the radio and microcontroller, and some programming.
